

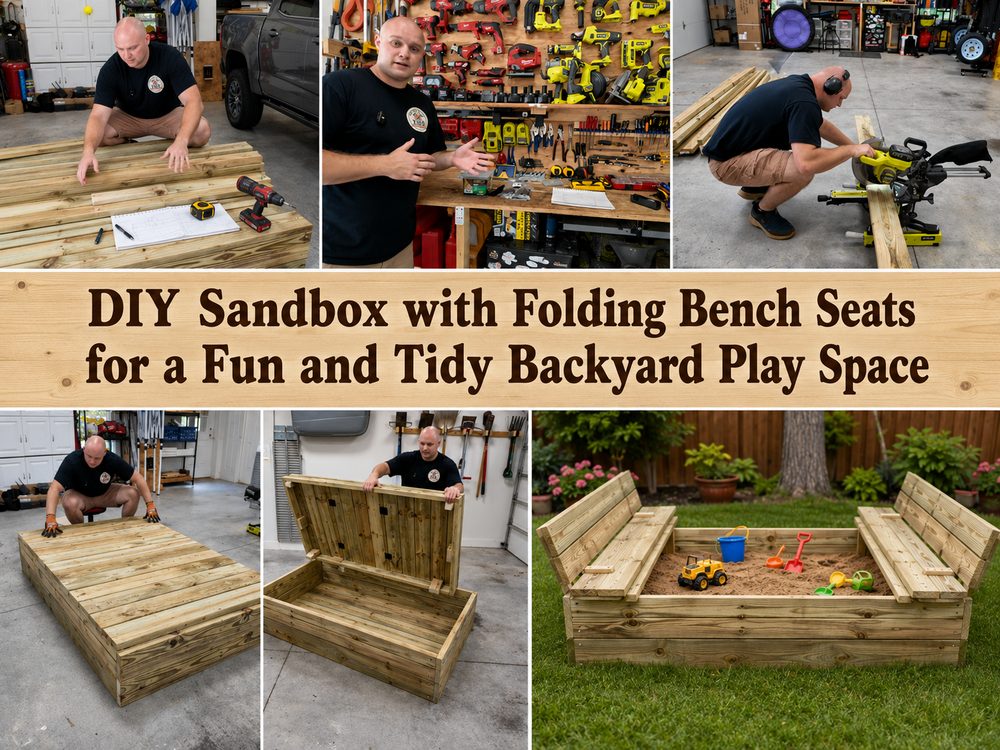
A DIY sandbox is one of those backyard projects that feels simple, useful, and really rewarding once it is finished. This version is especially nice because it is more than just a basic box of sand. It includes a folding cover that opens into bench-style seating, which helps keep the sandbox cleaner when not in use and gives kids a comfortable place to sit while they play. It is a great idea for families who want an outdoor play area that still looks neat and intentional in the yard. This kind of project works well for beginners who are ready for a straightforward wood build and want something practical with a polished final look. The featured tutorial shows a step-by-step build using 2×6 boards and a folding bench seat cover design.
Why You’ll Love This Project:
This sandbox feels more finished than a plain open sandpit. The folding bench design adds function, helps with cleanup, and makes the whole project look more like a thoughtful backyard feature than a temporary play area.
Materials Needed:
- Wooden boards for the sandbox frame
- Extra boards or slats for the folding lid and bench sections
- Wood screws
- Sandpaper
- Outdoor-safe wood finish or paint if desired
- Landscape fabric or a base liner if needed
- Play sand
Use similar materials that match the look, size, and style you want.
Tools Needed:
- Saw
- Drill or driver
- Measuring tape
- Sander or sanding block
- Clamps may help during assembly
- Basic household or workshop tools
Best Materials for This Project:
For a sandbox, sturdy outdoor-friendly lumber works best because it needs to handle weather, active play, and repeated opening and closing if you add a folding cover. Smooth boards with fewer rough edges are a smart choice for a child-friendly finish. If you want the sandbox to last longer outdoors, choose wood and finishes suited for exterior use, and use hardware that can handle moisture.
Skill Level:
Confident beginner. The build is straightforward, but the folding bench cover adds a little extra assembly work compared with a basic square sandbox.
Size and Placement Guide:
You can make the sandbox larger or smaller depending on your yard and how many children will use it. A compact version works well for patios, side yards, or smaller lawns, while a wider design suits open backyard spaces. Try to place it where there is enough room to walk around it comfortably. Partial shade can make playtime more comfortable, and level ground will help the build look neat and feel stable. You can also adjust the wood tone or paint color to fit the rest of your outdoor decor.
How to Make It:
Step 1: Prepare the Base
Start by choosing a flat area in the yard and clearing away grass, weeds, or loose debris. Check the space to make sure it feels level and has enough room for the sandbox to open fully if you are using a folding bench cover. Gather your boards, make your cuts, and sand any rough spots before assembly so the finished project feels smoother and safer.
Step 2: Build the Main Frame
The tutorial shows the sandbox being built from 2×6 boards, creating a strong wooden frame for the play area.
Lay out the boards in a square or rectangular shape and attach the corners securely. As you work, check that the frame stays even and lines up cleanly. This is the main structure, so taking time here will make the rest of the project easier.
Step 3: Add the Interior Base Area
Once the frame is together, prep the inside so it is ready for sand. Some makers like to add a liner or landscape barrier below to help separate the sand from the soil. Make sure the inside area is tidy and ready before moving on to the top section.
Step 4: Create the Folding Bench Cover
The standout feature of this tutorial is the folding bench seat cover. The lid is built in sections so it can close over the sandbox and then open into seating on both sides.
Arrange the top boards carefully, attach the connected sections, and test the movement as you go. The goal is for the cover to open and close smoothly while still feeling sturdy enough for regular use. Work slowly here and keep checking the alignment.
Step 5: Sand and Finish the Surface
Once the build is assembled, go over the surfaces again to soften edges and make the wood feel more comfortable to touch. If you want extra durability or a more finished look, add an outdoor-safe stain, sealer, or paint in a color that suits your yard. Let everything dry fully before adding sand.
Step 6: Fill, Decorate, and Style
Pour in play sand until the sandbox looks comfortably filled without being packed too high. Test the bench cover one more time and style the area around it with simple outdoor touches like stepping stones, a small shade option, or nearby toy storage. Keep the final setup neat so it blends nicely into your yard.
Helpful Tips:
- Measure carefully before cutting any wood
- Sand exposed edges well for a smoother child-friendly finish
- Test the folding sections before final tightening
- Keep the base area level so the lid works more evenly
- Let any paint, stain, or sealer dry fully before adding sand
- Choose a spot that is easy to supervise from the house or patio
Common Mistakes to Avoid:
- Cutting boards before double-checking the layout
- Skipping sanding on corners and top edges
- Making the folding sections too tight or uneven
- Using indoor-only finishes outside
- Overfilling the sandbox with sand
- Placing it on uneven ground without proper prep
Customization Ideas:
You can stain the wood darker for a more polished backyard look or keep it natural for a simple classic style. Add a canopy nearby for shade, paint the exterior in a playful color, or include storage bins for toys. You could also personalize it with name plaques, corner caps, or a matching outdoor play area around it.
Style Ideas:
This sandbox looks great in family backyards, especially near a patio, fence line, garden edge, or play corner. It works nicely with neutral outdoor decor, natural wood furniture, and simple landscaping. Because the cover folds into seats, it already has a cleaner and more finished look than many basic sandbox builds.
Care Instructions:
Brush off dirt and leaves regularly to keep the surface clean. Keep the sandbox covered when not in use so the sand stays fresher. Wipe the wood gently as needed, and refresh the outdoor finish over time if the surface starts to look worn. Check hardware now and then to make sure the folding sections stay secure.
Time Needed:
This project may take a short afternoon or a few hours depending on your materials, size, drying time, and detail level.
Budget Guide:
This can be a fairly budget-friendly backyard build, especially if you keep the design simple and use easy-to-find lumber and basic hardware. It may cost a bit more than a plain sandbox because of the folding bench cover, but the added function makes it feel worthwhile.
Conclusion:
If you want a sandbox that looks tidy, feels useful, and gives kids a fun place to play, this folding bench style is a great choice. It combines play, seating, and cover features in one smart build, and you can easily adjust the size and finish to match your yard. With careful measuring and a little patience, you can create a backyard project that is both practical and charming.
FAQs:
1. Is this sandbox beginner-friendly?
Yes, it is suitable for a confident beginner, especially if you are comfortable with basic measuring, cutting, and drilling.
2. What materials are best for this project?
Smooth, durable outdoor-friendly wood and weather-resistant hardware are the best choices.
3. Can I make it bigger or smaller?
Yes, you can scale the size to fit your yard and the space your family needs.
4. Can I use recycled materials?
You can, as long as they are clean, sturdy, and safe for outdoor use.
5. Can this stay outdoors year-round?
Yes, but it will last better with proper finishing, regular upkeep, and a cover to protect the sand.