

A DIY worm compost bin is one of the easiest ways to turn everyday kitchen scraps into rich, garden-friendly compost without needing a big outdoor setup. This project is especially nice for small spaces because it fits neatly in a garage, patio corner, laundry area, or other tucked-away spot. The version shown in the tutorial uses a basic bucket system, so it feels approachable even if you have never tried vermicomposting before. It is a practical project for gardeners, apartment dwellers, families, and anyone who wants to reduce food waste in a simple way. Once your bin is set up, the worms do most of the work for you. With a little care, you can create a low-mess composting system that is affordable, useful, and satisfying to maintain.
Why You’ll Love This Project:
This worm compost bin is compact, budget-friendly, and easy to make with simple materials. It gives food scraps a useful purpose and creates nutrient-rich compost for plants without needing a large backyard setup.
Materials Needed:
- A 5-gallon bucket with lid
- A second container or bucket section for collecting moisture, if used in the setup
- Bedding material such as shredded paper or cardboard
- Composting worms
- A small amount of food scraps
- Dry material to help balance moisture
Use similar materials that match the look, size, and style you want.
Tools Needed:
- Drill or another tool for making air and drainage holes
- Marker for planning hole placement
- Basic household or garden tools for setup
Best Materials for This Project:
A sturdy plastic bucket works well because it is lightweight, easy to clean, and simple to modify. Shredded paper or cardboard makes a good beginner bedding choice because it is inexpensive and easy to find. For food scraps, soft fruit and vegetable waste usually works best when starting out. Choose clean, outdoor-safe or moisture-resistant materials if your bin will stay in a garage, patio, or covered outdoor area.
Skill Level:
Beginner-friendly. The build is simple, the materials are easy to source, and the process is more about basic setup than advanced construction.
Size and Placement Guide:
You can keep this worm bin small for a kitchen compost setup or adapt the same idea to a slightly larger container if you need more capacity. A bucket-style bin works well in a shaded patio area, garage, utility room, or other cool spot out of direct sun and heavy rain. Choose a size that matches how many scraps your household produces. If you want it to blend into your space, use a neutral bucket or keep it inside a simple storage corner with easy access.
How to Make It:
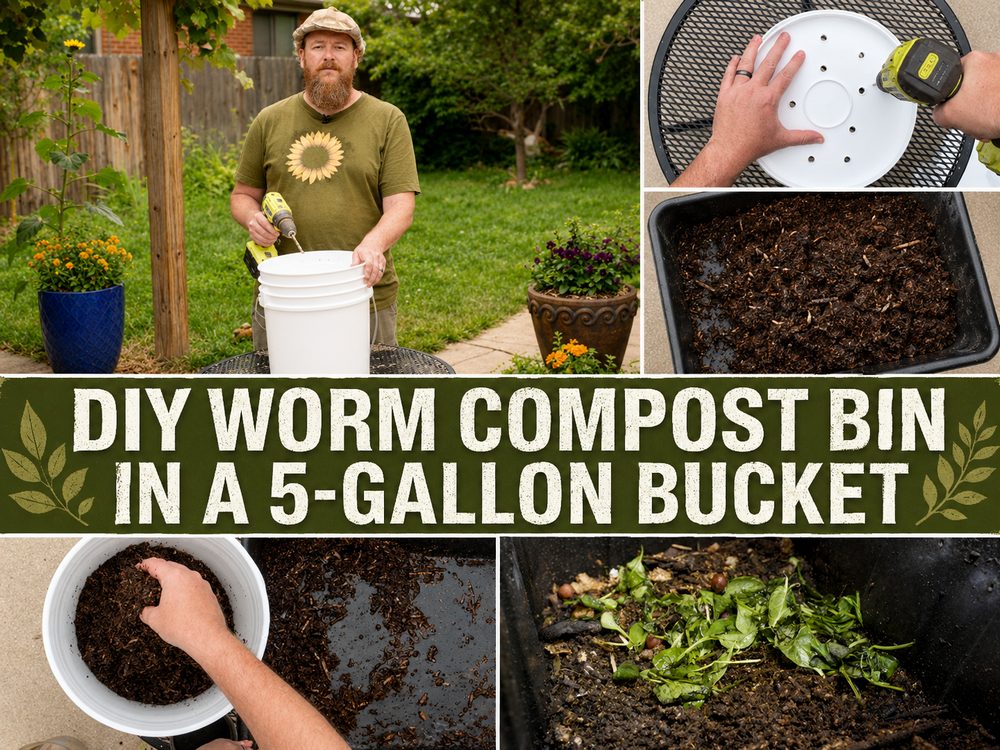
Step 1: Prepare the Base
Start with a clean bucket and lid. The tutorial shows turning a standard bucket into a compact worm composting system by adding airflow and drainage. Mark where you want the holes, then make them carefully so the bin can breathe and excess moisture has a way to escape. Keep the layout neat and practical.
Step 2: Arrange the Pieces
If your setup includes a lower section for collecting liquid or separating moisture, place that underneath before adding the composting layer. Fit everything together so the top container sits securely and the lid can still close properly. The goal is to create a simple stacked or contained system that is easy to manage.
Step 3: Build the Bin Interior
Add damp bedding material first. This gives the worms a soft, comfortable place to settle in and helps create the right environment from the beginning. Fluff the bedding so it is not packed too tightly. A loose, airy texture works better than a dense layer.
Step 4: Add the Worms and Food
Once the bedding is ready, add the worms and give them a small amount of food scraps. Do not overload the bin at the start. A light first feeding helps the system adjust without becoming soggy or smelly. Spread the scraps in a way that lets them mix into the bedding naturally.
Step 5: Add Color or Texture
This project is more functional than decorative, but you can still make it look tidy. Label the lid, keep the outside clean, or use matching containers if the bin will sit in a visible area. A neat setup makes it easier to maintain over time.
Step 6: Finish and Style
Close the bin with the lid and place it in a suitable spot. After setup, the main focus is care and balance. Add scraps gradually, keep an eye on moisture, and adjust bedding as needed. Over time, the contents will break down into rich worm castings that can be used in the garden or around houseplants.
Helpful Tips:
- Drill holes neatly and space them well for airflow.
- Start with damp bedding, not soaking wet bedding.
- Add food scraps in small amounts at first.
- Keep the bin in a cool, shaded area.
- Balance wet scraps with dry paper or cardboard when needed.
- Check the bin regularly so you can adjust moisture before it becomes a problem.
Common Mistakes to Avoid:
- Making the bedding too wet
- Adding too many food scraps at once
- Forgetting airflow holes
- Leaving the bin in direct heat or strong sun
- Using a weak or loose lid setup
- Ignoring odors or excess moisture early on
Customization Ideas:
You can make the bin larger or smaller depending on your space. Try a neutral, garden-style look for a shed or patio, or keep it simple and discreet for indoor use. You can also label feeding zones, add a tray underneath for protection, or use recycled containers if they are sturdy and clean.
Style Ideas:
This project is mostly practical, but it can still look organized and intentional. Tuck it into a garden workstation, place it near potting supplies, or keep it in a clean utility corner. It also works well as part of a low-waste home setup.
Care Instructions:
Keep the bin lightly moist and out of harsh weather. Wipe the outside gently if it gets dusty. Avoid overfeeding, and add dry bedding when the contents feel too wet. If the bin is kept outdoors, use a sheltered spot so heavy rain and strong heat do not upset the balance inside.
Time Needed:
This project may take a short afternoon or a few hours depending on your materials, setup style, and how much detail you add.
Budget Guide:
This can be a very affordable project, especially if you already have a bucket, basic tools, and some recyclable paper or cardboard at home.
Conclusion:
A simple worm compost bin is a smart little project that turns waste into something useful while taking up very little room. It is practical, beginner-friendly, and easy to adjust for your own home or garden routine. Once it is set up, it becomes one of those satisfying DIY projects that keeps giving back. Try it in a size and style that fits your space, and let your composting system grow from there.
FAQs:
1. Is this beginner-friendly?
Yes, this is a great starter project because the build is simple and the materials are easy to find.
2. What materials are best for the bedding?
Shredded paper or cardboard works well because it is easy to use and helps balance moisture.
3. Can I make it bigger or smaller?
Yes, you can adapt the same idea to fit a smaller household or a larger composting setup.
4. Can I use recycled materials?
Yes, clean recycled containers and paper-based bedding can work very well.
5. Can I use it outdoors?
Yes, but it should be kept in a protected area away from direct sun and heavy rain.