

A pallet mud kitchen is one of those outdoor projects that feels both playful and practical. It gives kids a special place to mix, scoop, pretend cook, and enjoy messy backyard fun, all while making good use of reclaimed wood.
This style of project is especially appealing if you like budget-friendly DIY ideas with a rustic look and a handmade feel. The featured build uses old pallets to create a simple outdoor play kitchen, so it is a great inspiration for anyone who wants something charming without making the project overly complicated. It works well in a garden corner, on a patio, or near a play area where little ones can enjoy water, soil, leaves, and all kinds of creative sensory play. The overall design is relaxed, useful, and easy to personalize.
Why You’ll Love This Project
This project is charming, useful, and full of personality. It turns simple pallet wood into an outdoor play space that encourages imagination, sensory play, and creative fun while also adding a cute rustic feature to the yard. The tutorial shows a pallet-based kids’ mud kitchen with a clear step-by-step build approach, which makes it a very approachable idea for DIYers.
Materials Needed
- Reclaimed pallets
- Extra scrap wood if needed for support pieces or shelves
- Screws or suitable fasteners
- A bowl, sink insert, or play tray for the “sink” area
- Hooks, knobs, or small hanging pieces for utensils
- Sandpaper
- Paint, wood stain, or outdoor finish if desired
Use similar materials that match the look, size, and style you want.
Tools Needed
- Drill or driver
- Saw suitable for pallet wood
- Pry tool or hammer for pallet prep
- Measuring tape
- Sander or sanding block
- Basic household or workshop tools for assembly
Best Materials for This Project
For a mud kitchen, sturdy reclaimed pallet wood works well because it gives that rustic outdoor look and keeps the project affordable. Choose pallets that are clean, dry, and still solid. For any parts that will hold weight, stronger boards are the better choice. If the kitchen will stay outside, an outdoor-safe finish can help it last longer. For the sink section, a simple metal or plastic bowl is often practical because it is easy to clean and suits pretend play.
Skill Level
Easy to confident beginner. The design is simple and practical, but pallet prep, cutting, sanding, and assembling reclaimed wood can take a little patience.
Size and Placement Guide
You can make this mud kitchen wider, shorter, or taller depending on the space you have and the age of the children using it. A compact version works well on a patio or balcony-style outdoor area, while a longer version can fit beautifully along a fence or garden wall. You can keep the natural wood look for a rustic garden style or paint it in soft, cheerful colors to match your backyard decor. Place it somewhere with enough room for play, easy cleanup, and a bit of shelter if possible. Good drainage nearby is also helpful since mud kitchens usually involve water and messy fun.
How to Make It
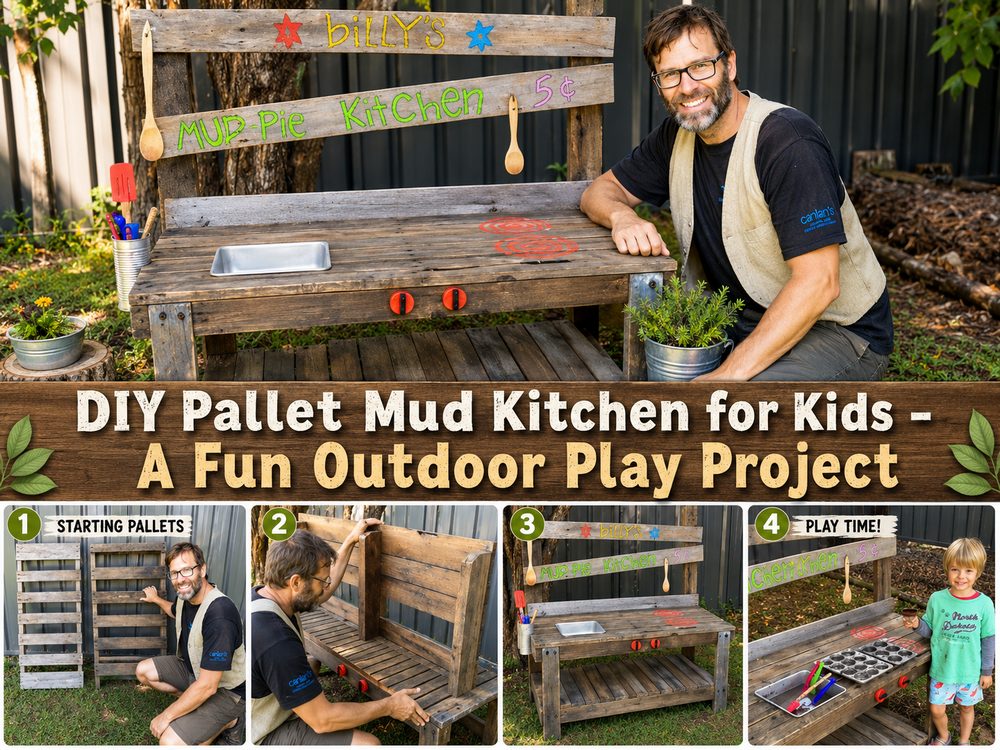
Step 1: Prepare the Base
Start by choosing the best pallet pieces for the main body of the mud kitchen. Clean everything well and check for rough edges, loose nails, or damaged boards. Take the pallets apart only as much as needed, since some builds work well by using large pallet sections as the starting structure. Sand the surfaces so they feel smoother and safer for little hands.
Step 2: Plan the Layout
Before attaching anything, decide where the countertop, shelf, and sink area will go. A simple layout usually includes a main work surface, a lower shelf or storage area, and some kind of back panel for hooks or decor. Dry-fit the pieces first so you can see the proportions before permanent assembly.
Step 3: Build the Main Shape
Use the pallet sections to form the main kitchen frame. Attach the sides, then secure the worktop area so it feels stable. Add support pieces where needed, especially if the wood is uneven or reclaimed from different pallets. The tutorial’s approach focuses on creating a straightforward outdoor play kitchen from old pallets, so the structure stays practical rather than overly fussy.
Step 4: Add the Counter and Shelf Areas
Once the base is steady, add the top surface and any lower shelf space. This gives kids a place to mix mud pies, hold bowls, or line up play items. If you want more storage, you can add another simple ledge or open shelf using leftover boards.
Step 5: Make the Sink Section
Cut an opening or create a fitted space for a bowl, tray, or small basin. This becomes the pretend sink area and makes the mud kitchen feel more interactive. Test the fit before securing the surrounding boards. It does not need to be fancy, just neat, usable, and easy to remove for cleaning if needed.
Step 6: Add the Back Panel and Details
A vertical back section helps the kitchen look complete and gives you a place to attach hooks, utensils, or decorative touches. You can also add a small top shelf, hanging rail, or simple trim pieces if the design needs a little more character.
Step 7: Add Color or Texture
At this stage, decide whether you want the raw pallet look or a painted finish. Sand again where needed, then paint, stain, or seal the wood. For outdoor use, a weather-friendly finish is a smart choice. You can keep it natural for a rustic style or brighten it with playful colors for a child-friendly look.
Step 8: Decorate and Style
Finish the mud kitchen with bowls, spoons, pots, old kitchen tools, or garden-themed accessories. Keep the setup simple so it still feels easy to use. A few hooks, a little storage, and one or two decorative details are usually enough.
Helpful Tips
- Check pallet wood carefully before using it.
- Sand the touch points well, especially edges and corners.
- Test the layout before screwing everything together.
- Keep the sink insert easy to remove and clean.
- Use an outdoor-safe finish if the kitchen will stay in the garden.
- Add simple accessories instead of overcrowding the design.
Common Mistakes to Avoid
- Starting with weak or damaged pallet boards
- Skipping sanding on rough surfaces
- Building the frame before checking the layout
- Making the sink opening too large for the bowl
- Adding too many decorations that reduce workspace
- Leaving outdoor wood unprotected in very wet conditions
Customization Ideas
You can paint the mud kitchen in soft pastels, bright playful shades, or classic natural wood tones. Add a chalkboard section, mini plant pots, labeled jars, or a row of hooks for utensils. For a more garden-inspired style, include herb pots or nature-themed accessories. You can also make it larger for siblings or keep it compact for a smaller yard.
Style Ideas
This project looks lovely in a backyard play corner, beside a sandbox, near a raised bed, or along a fence with a few potted plants around it. It also makes a thoughtful handmade gift for families with young children. Style it with simple play cookware and natural outdoor textures for a warm, inviting setup.
Care Instructions
Dust or brush off dry dirt regularly. Wipe the surfaces gently when needed, and empty any standing water from the sink area. If painted or sealed, refresh the finish when it starts to wear. During harsh weather, covering the kitchen or moving loose accessories indoors will help it last longer.
Time Needed
This project may take a short afternoon or a few hours depending on your materials, size, drying time, and detail level.
Budget Guide
This can be a very budget-friendly build if you already have access to clean pallets, leftover screws, and a few basic tools. Reclaimed and reused materials help keep costs low while still creating something charming and practical.
Conclusion
A DIY pallet mud kitchen is a wonderful way to turn simple reclaimed wood into something playful, useful, and full of charm. It is a project that feels creative without being overly complicated, and it leaves plenty of room for your own style. Whether you keep it rustic or dress it up with color and accessories, the finished piece can bring a lot of joy to an outdoor space.
FAQs
Is this beginner-friendly?
Yes, it suits a beginner or confident beginner, especially if you are comfortable with basic cutting, sanding, and assembly.
What materials are best?
Solid, clean pallet boards are a great starting point, along with sturdy fasteners and a removable bowl or tray for the sink area.
Can I make it bigger or smaller?
Yes, the size can be adjusted to suit your space and the children who will use it.
Can I use recycled materials?
Yes, reclaimed wood and reused accessories are perfect for this style of project as long as they are clean and safe.
Can I use it outdoors?
Yes, it is designed as an outdoor play feature, but it will last better with an outdoor-safe finish and a bit of weather protection.