

A crochet potli bag is a great little project to make when you want something practical, decorative and fun all rolled into one. This tutorial teaches a small drawstring style potli bag with a rounded shape and a fresh and charming finish with a playful fruit inspired look. It is the kind of bag you can gift, wear for festive occasions, store little essentials or just add a handmade touch to your outfit. The process is easy to approach without compromising the pretty finished look because it’s made as an easy to make drawstring bag. The tutorial structure is nicely divided into materials, the base, the bag body, the drawstring and finishing. So it provides a complete project, not just a quick preview. That makes it a good choice for anyone who actually wants to crochet the bag from start to finish.
What You’ll Like About This Project
This potli bag is fun because it is small enough to be manageable, but still gives you the satisfaction of making a real crochet bag with shape, texture and a working drawstring. Rounded body and gathered top gives it that classic potli feel while simple step by step structure keeps it beginner friendly.
Materials Required
Thread.
Crochet needle
scissors.
Yarn needle
Progress markers
Tape measure
Drawstring cord or crocheted ties for a matching finish
Select the yarn and hook size to give the fit and texture you desire.
Suggested Yarn For This Pattern:
A bit of body in the yarn is best for a potli bag as it helps the shape hold nicely once the drawstring is pulled. If you want a crisp looking bag that holds its rounded shape well, cotton is a good choice. Cotton blend is also lovely if you want a little softness but not loose structure. This project has a playful, lightweight look, so a smooth yarn will usually show the stitch texture more clearly than a fuzzy yarn.
Skill Level: (average)
Easy to beginner friendly.
This tutorial is written as a beginner crochet bag tutorial and even breaks the process down into sections like materials, base, body, drawstring and finishing. So it’s a nice project for somebody who knows the basic stitches and wants to try a small bag.
Size & Fit Guide:
Because it is a potli bag, you can change the size by changing the width of the base and increasing the length of the body to the desired height. If you want a smaller pouch style bag, stop sooner. If you want a bigger little handbag, keep trying and it will feel right. Before you add the drawstring, hold the bag in your hands and imagine how much gathering you want at the top.
Stitches employed:
The base, body and drawstring sections seem to be constructed in a simple and beginner friendly way. Go through the basic repeated stitches in the video carefully, paying particular attention to keeping your stitch count even around the base and body so the shape stays balanced. The stitch flow is easy to follow for beginners as the tutorial is for beginners.
How to Make It
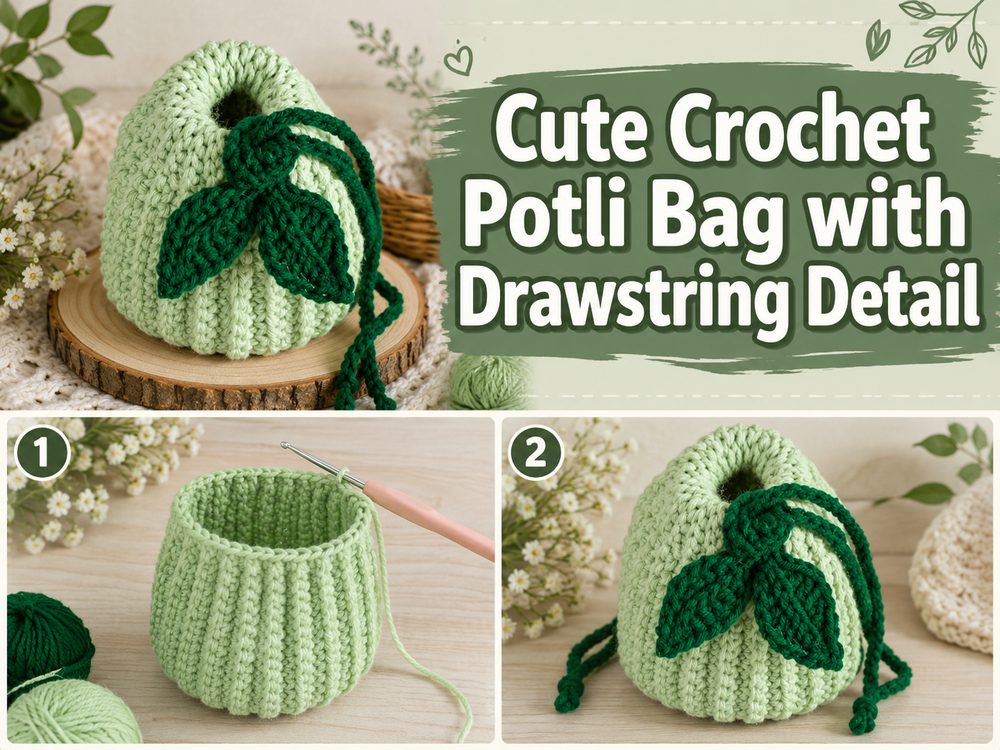
Step 1: Begin the Base
The tutorial starts with the base, which is one of the most important parts of the whole bag. A potli bag needs a nice base to support the rounded body, so this first section helps to create the shape from which everything else grows. The video outline includes a section entitled “Starting the Base” which makes it easy to follow the project in a logical order.
As you work through this section try to keep your stitches even and not pull too tight. A neat base will help the bag sit better when it is done. The bag has a drawstring top, so you want the bottom part to feel balanced and symmetrical for the best look. Your base is curling too much , loosen your tension a little and make sure your rounds are staying even .
Step 2: Create the Bag Body
After completing the base, work upwards to make the main body of the potli bag. The tutorial has a separate section called “Crocheting the Bag Body”, so obviously this is where the pouch shape comes from.
At this stage, the bag starts looking more like a potli. As you crochet up the fabric starts to take on that soft rounded pouch shape that makes drawstring bags so attractive. Monitor the height as you go. A shorter body means a more compact decorative pouch, while a taller one allows a little more room for small essentials.
If you want the bag to hold it’s shape and neatness, keep your tension consistent. Potli bags usually look best when stitches are consistent all around. Unequal tension will make one side pull differently and this is more obvious once the top is gathered.
Step 3: Give it a real potli shape
The gathered top and rounded body give a potli bag its special look. As you work the main section, consider how the upper section will close. You want some space near the top where the drawstring can gather nicely without feeling stiff.
This is also a good time to lay the bag flat and check proportions. The body should feel full in the middle and have enough height above the widest point to give that lovely gathered finish. The tutorial’s structure implies a progression from the body to the drawstring stage, which helps the bag to retain that familiar potli style.
Step 4: Make the drawstring section
One of the most exciting parts of the project is a section in the tutorial called “Creating the Drawstring” as this is what turns a simple pouch into a proper potli bag.
Work on this area carefully to keep the top edge tidy. If the tutorial has spaces or openings for threading the cord, make sure they are even all around. This makes the drawstring pull easier when you cinch it tight. The potli bag should have a comfortable gather and not be awkwardly bunched in one place.
When you put the drawstring in, test it out gently before tying anything in permanently. Pull both sides and watch how the top closes. You want the bag to cinch in well and still have a rounded bottom. That soft gathered top is what gives the project its finished look.
Step 5: Attach Cord or Tie
When your openings are completed, run the drawstring through the top section. This can be done with a crocheted cord, a simple chain, or some other matching tie depending on the look you want. A crocheted tie is a nice way to go for a softer handmade style. A smooth cord also works well for a quick, clean finish.
Measure the length before cutting or tying off the ends. The ties should be long enough to comfortably pull the bag closed and still have a little extra to add knots, tassels or decorative ends if you want them. The potli bag looks better if the ties are not too short
Step 6: Finish and Purge the Bag
The tutorial closes with a finishing section and this is where the bag gets its polished final look.
Tidy up all the loose ends, especially around the base and the drawstring part. This is a small bag so well finished makes a big difference. Gently shape the pouch with your hands to form a rounded body and a smooth top gather.
The finished bag should be cute, compact and softly structured with a rounded base, worked body and easy drawstring closure. This tutorial is both a drawstring potli bag and a beginner crochet bag tutorial, so the overall construction is still practical and approachable, but gives a stylish result.
Handy Tips
Keep your tension even on your base stitches so that the bag shape is balanced.
For better holding of shape of potli go for cotton yarn.
Check the height before you start on the drawstring section.
Space the openings for the drawstrings evenly.
Test the drawstring before you cut the ends.
Carefully weave in ends so the inside of the bag stays tidy.
Mistakes To Avoid
Crocheting the base too tight so it curls too much
Making the body too short for a good gathered top
Even before the tie, not checking the top edge
Using a drawstring too short to close comfortably
The gathered top must not be drawn too tight, or the shape will be spoilt.
leaving chunky ends around the channel for the drawstring
Ideas for Customising
There are many easy ways to personalise this potli bag. Change the colours to make it festive, elegant, playful or ready for gift giving. For extra charm, add tassels to the ends of the drawstring. Beads, a small flower or decorative edging can make the bag feel more dressed up. You can go up a size to carry the essentials or keep it small as a pouch for jewellery, gifts or tiny accessories.
Style Inspiration
A crochet potli bag is perfect for festive outfits, handmade gifting, little return gifts, or carrying small essentials in a cute way. It can be used as a mini-project bag, a special pouch inside a larger tote or as a handmade accessory for casual days when you want something unique.
How to Care For
Hand wash gently in cool water, don’t wring the bag too hard. Squeeze out the excess water, reshape and lay flat to dry. If you notice your drawstring has twisted after washing, straighten while the bag is still damp. Keep the heat low so your yarn doesn’t lose its shape.
Time Required
This may take a few hours depending on your speed, yarn, size and stitch pattern. The tutorial is written in a simple step by step format for beginners, with individual sections for the base, body, drawstring and finishing, so it feels like a small manageable bag rather than a long complicated make.
Conclusion
A crochet potli bag is such a charming project when you want to make something small, useful, and pretty. This one has the classic gathered drawstring look that makes potli bags so appealing, and the step-by-step structure keeps the whole project approachable. You can keep it simple, play with colors, add decorative details, and adjust the size to suit your needs. It is a sweet little crochet make that feels both practical and special.
FAQs
Is this project beginner-friendly?
Yes. The tutorial is presented as a beginner crochet bag tutorial and is broken into clear stages.
What yarn works best for a crochet potli bag?
Cotton or a cotton blend works very well if you want a tidy, shaped finish.
Can I adjust the size?
Yes. You can make the base and body larger or smaller depending on how roomy you want the bag.
Do I need a separate drawstring cord?
Not always. You can crochet your own tie or use another cord that suits the look you want.
What can I use this bag for?
It works nicely for small essentials, gifts, festive styling, or as a cute little pouch.