
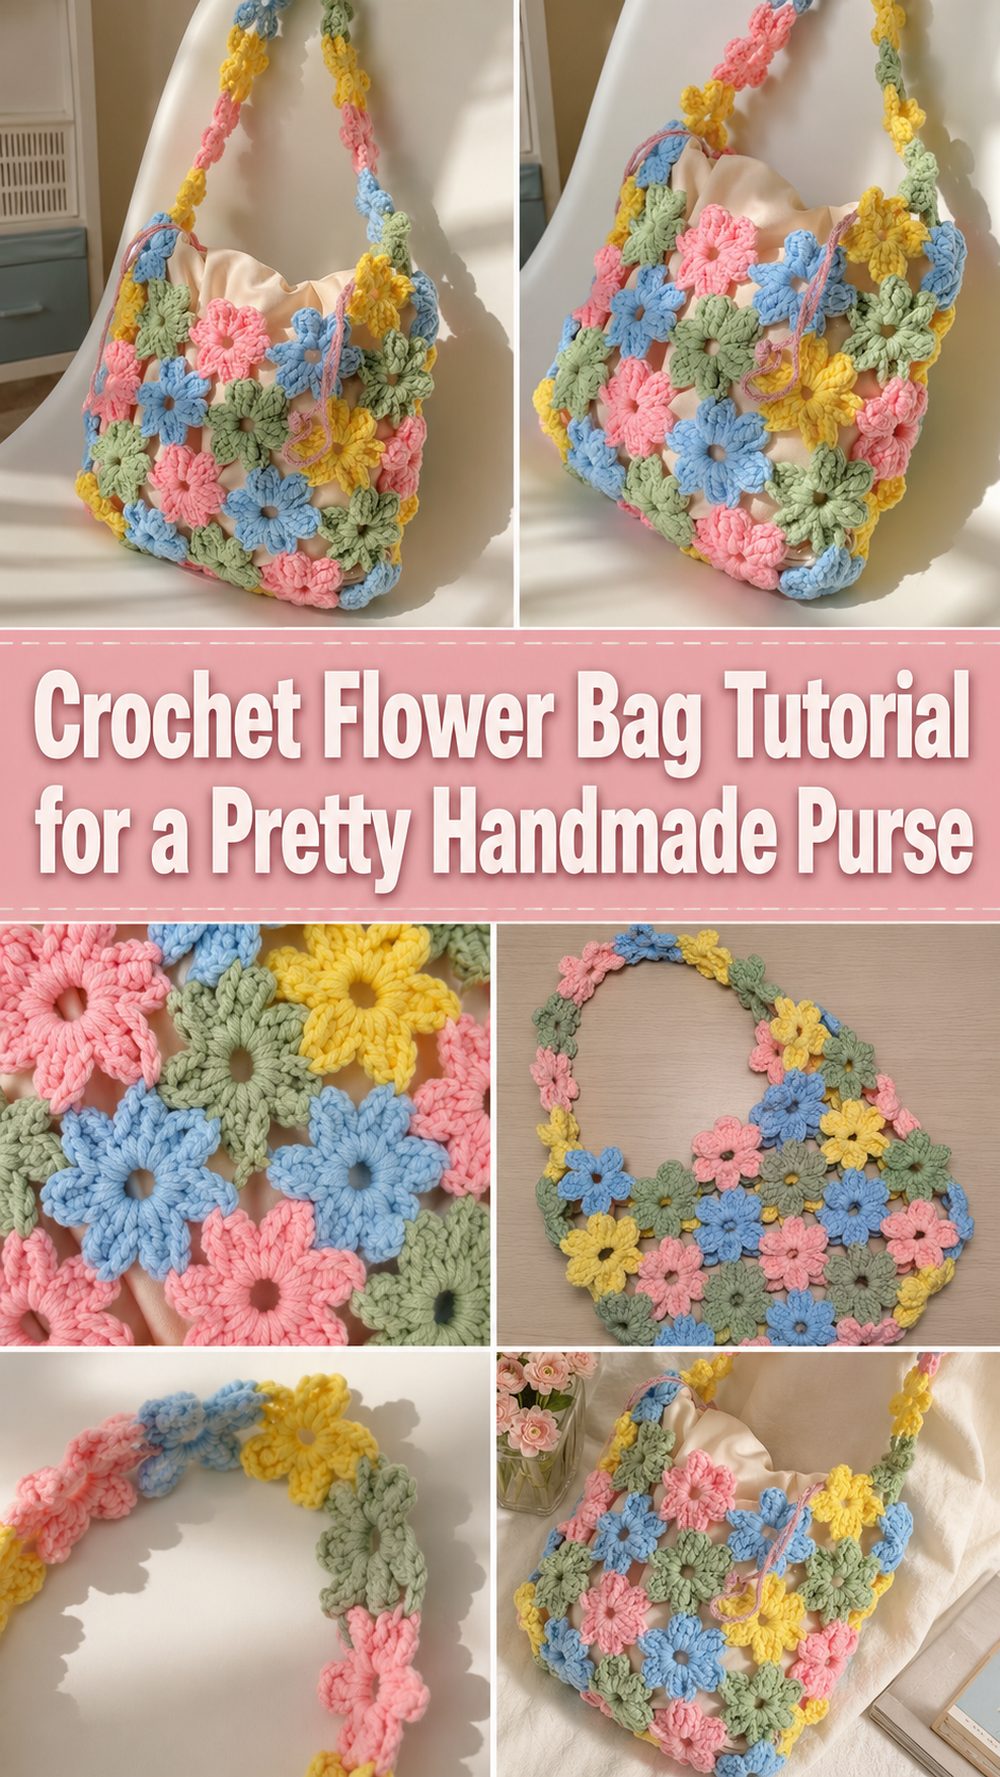
This crochet flower bag is one of those sweet handmade projects that feels playful, stylish and useful all at once. Instead of beginning with a plain square or rectangle bag, this design begins with a flower shape, so the finished purse has a soft floral look from the center out. It’s a lovely project for spring and summer outfits, handmade gifts, market days, casual walks or anyone who loves cute accessories with a little personality. It is small enough to be fun and manageable, yet practical enough to hold simple essentials like keys, lip balm, cards or a small wallet. This flower bag is a lovely project that looks fancy but is simple enough if you like crocheting projects.
Why You’ll Love This Project:
This crochet flower bag is great because the decoration is the very shape. You don’t need to add tonnes of extra bits to make it pretty, as the petals and round floral centre already make the bag look charmingly handmade. It’s also a nice project for using your favourite colour combinations, whether you want something soft and romantic or bright and playful or simple and neutral.
Materials Required:
Yarn for small crocheted bag
Crochet hook that matches your yarn well
Scissors
Yarn needle,
Stitch markers – great for keeping your rounds neat
Measuring tape, especially if you need to resize
Optional zipper, button, lining or closure to make the bag feel more secure
Use a yarn and hook size to achieve the fit and texture you desire.
Best Yarn for This Project.
Choose a yarn for a flower bag that will give the bag enough structure but not be stiff. Cotton yarn is a good choice as it holds stitch definition well, and gives the petals a nice clean shape. If you want the bag to feel a little softer a cotton blend can also work nicely. For a stiffer purse, thicker cotton, t-shirt yarn or a firm acrylic yarn will work. If you want a lighter summer version, pick a breathable cotton or bamboo blend yarn, and stay away from very fuzzy yarns, the flower details will show up better with smoother fibres.
Level of Skill:
This project is perfect for confident beginners or easy level crocheters. The bag is worked using basic crochet stitches, but the shape of the flower means you should be comfortable working into a ring, joining rounds and keeping your stitches even. If you’ve made a round motif, coaster or granny-style piece before, this project should feel approachable.
Size & Fit Guide:
The size of the flower bag depends on your yarn, hook, tension and the number of rounds or petals you work. Make the flower small and tight for a small purse. If you want a bigger bag, use thicker yarn or keep building the shape until the front and back pieces are wide enough for you. Before you start, put your essentials on top of one flower panel to check if the bag is big enough. If you want a deeper bag, add more rounds or side rows before you close it up. For the strap, measure where you want the bag to sit on your body, then adjust the strap length and fasten securely.
Stitches Used:
The tutorial starts off clearly with a slip knot, chains, and a slip stitch join to form a ring. It also uses taller crochet stitches for the shape of the flower and chain spaces and joined rounds. Depending on your version you could use:
Chain
Slip stitch
Double crochet and other tall stitches
Double crochet sort of stitches
“Working in shifts
Seam joining
Basic edge stitches
How To Make:

Step 1: Open Centre Ring
First make a slip knot, then chain the number of stitches required for the center of the flower. The tutorial begins with a small chain ring and then joins the last chain to the first chain with a slip stitch. This makes the central opening where the first round of stitches will be worked.
Try not to over-tighten the starting chain. The slightly loose ring allows the first stitches to be neatly placed. Once joined, make sure the chain is not twisted as it should lie flat in the center before you begin to build the flower.
Step 2: Create the first round of the flower
When the ring is done, work chains up to the height for the first tall stitches. The first round should be evenly balanced because the flower shape starts out from this middle. Longer stitches create a soft rounded petal effect instead of a tight flat circle
Work around the ring, keeping your stitches close enough together to fill in the center but not so crowded that the piece starts to curl. If the center cups too much, lower the tension a little. If it looks floppy, pull up your stitches a bit neater or use a smaller hook for better structure.
Step 3: Form the Petals
The pretty part of this bag is the shaping of the petals. The height is built up with chains and taller stitches for each petal, and the stitches are joined or anchored in a way that makes the shape arc naturally. The petals should be rounded and full, almost like a flower motif enlarged to purse panel size.
Take your time on each petal, and try to make them all the same size. If one petal is much taller or looser than the others it will show in the final bag. Stitch markers can help you mark the beginning of the round or where petals repeat spaces.
This is also where the colour choices can make the bag even cuter. You can do the whole bag in one colour for a clean modern look, or do one colour for the center and a different colour for the petals. The contrast center with soft petal colours makes the bag have a sweet floral style.
Step 4: Make the Flower Panel Big Enough
When you have the basic flower shape, continue building the panel until it is the size you want for the bag front. The panel should be stiff enough to keep its shape, but flexible enough to open slightly when used as a purse.
Lay the flower on the table and smooth it down with your hands. If it lays nicely without pulling, you’re on the right track. If your edges ripple too much you might have stitches too loose or too many stitches in the outer round. If the flower cups in, you may have a tight tension or the outer round needs more room.
Step 5: Do the other side
A bag needs a front and back so make another matching flower panel in the same way. The second piece should be as close to the first as possible. Make sure you use the same yarn, hook, tension and number of rounds so that the two sides will match nicely when you join them.
Before you join the two flower panels place them together, right sides out. Check that the petals match up along the edges. This simple check makes the joining step much cleaner and helps the finished purse look balanced.
Step 6: Attach the Bag Sections
Join the two flower panels around the edges (leaving an opening at the top) to form a bag. Depending on the look you want, you can join with slip stitches, single crochet or another simple edging method. A slip stitch join gives a flatter seam and single crochet makes a slightly stronger raised edge.
Start on one side of the upper side and go around the lower part of the flower shape, leaving the top open. Don’t tighten the joining stitches too much as a tight seam will make the bag pucker. As you work, try to match the stitches and petal points so the front and back are even.
Step 7: Finish the Top Opening or Add
Connect the sides and clean up the top opening. A simple round of stitches around the opening can make it a little stronger and neater. Very helpful if the bag will be used a lot, because the top edge gets the most handling.
If you want the bag to close, add a zipper, a button loop, a drawstring or, if you feel comfortable sewing one in, a magnetic snap. For a super simple version, leave the top open and use it as a cute mini purse!
Step 8: Making the Strap
You can make the strap with chains, rows of simple stitches or a more robust crocheted band. The length depends on how you want to carry the bag. A short strap turns it into a hand purse, a medium strap makes it a shoulder bag and a longer strap makes it crossbody.
Before you sew the strap on, hold the bag up against your body to see how the length looks. The crochet straps may stretch a little with use, especially if the bag is full of weight, so it is better to make the strap firm and secure. Sew both ends to the upper sides of the bag carefully and weave in the yarn tails well.
Step 9: The Finishing Touches
Weave in all ends with a yarn needle, hiding the tails inside the nearby stitches. Once the yarn is secure, trim carefully. If you need to shape the flower petals, lightly block the bag by rubbing it in place. However, light blocking can make the petals look much cleaner, for the cotton yarn.
Your finished bag should look like a soft crochet flower purse, with a rounded floral front, a matching back, neat joined sides and a strap that feels comfortable to carry. It has to be strong enough for little essentials, but still maintain that pretty handmade flower shape.
Useful Tips:
If you want the flower details to stand out, use smooth yarn. Cotton is good for a clean summer bag especially. Maintain even tension. Uneven stitches will lead to one petal being larger than the other. Make both flower panels the same size, then join them together. Check the bag opening before you finish so that your hand can fit inside comfortably. If you add a strap, make sure to sew it on well with extra stitches. Lightly block the finished bag and shape the petals as the bag dries for a cleaner finish.
Common Pitfalls to Avoid:
Don’t make the center ring so tight that the first round is hard to work in. Do not change hook size between the front and back panels; they may not match. Don’t sew the bag all the way around, remember to leave the top open. Don’t use loose strap attachments as the strap carries the weight of the bag. Make sure to weave in ends tightly, especially around the handle and seams. A crochet flower bag is usually best for light everyday items so you should try not to overfill the finished purse.
Ideas for Customisation:
Make this flower bag in one solid colour for a simple boutique-style purse, or use different colours for the center and petals, edging and strap. For a softer look add a scalloped border, for a cleaner finish leave the edge plain: It can be cute and practical with a button closure. You can add a lining of fabric, too, if you want to carry smaller things without them falling through the stitches. For a fun version, make the petals bright and bold. For a romantic look, try cream, blush, lavender or soft yellow.
Style Tips:
This bag looks gorgeous with summer dresses, jeans and a simple top, beach outfits, festival clothing or casual weekend looks. It is also a thoughtful hand-made gift for someone who loves floral accessories. The scaled down version can be used as a child’s purse while a larger version can become a statement shoulder bag. Pick neutral yarns for everyday wear or colourful yarns for a happy spring and summer accessory.
Care Instructions:
Wash the bag gently by hand with mild soap and cool water. Don’t wring it out too hard, as that can stretch the flower shape. Press excess water out with a towel, and lay the bag flat to dry. Shape the petals and strap while damp so the finished piece will dry neatly. Avoid high heat, especially if you use acrylic or blended yarns.
Required time:
This will take you a few hours depending on your speed, yarn, size and stitch pattern. A small flower purse can be a fairly quick project, but a larger or lined one will take more time.
Conclusion:
A crochet flower bag is a sweet project that gives you both beauty and function in one handmade piece. The flower shape makes it feel special, while the simple construction keeps it enjoyable to make. You can adjust the size, colors, strap length, and closure to match your own style. Once you understand the basic flower panel and joining method, it becomes easy to create a bag that feels personal, pretty, and fun to carry.
FAQs:
Is this crochet flower bag beginner-friendly?
It is best for confident beginners. You should know how to chain, slip stitch, work basic stitches, and join rounds.
What yarn is best for a flower bag?
Cotton or cotton-blend yarn works very well because it gives nice stitch definition and helps the bag hold its shape.
Can I adjust the size?
Yes. Use thicker yarn for a larger bag, thinner yarn for a smaller one, or continue the flower panel until it reaches your preferred size.
Can I make this bag for summer?
Yes. Use lightweight cotton, bamboo blend, or breathable yarn, and keep the stitches neat but not too heavy.
How do I make the strap stronger?
Use firm stitches, avoid loose tension, and sew or crochet the strap securely onto both sides of the bag.
Can I sell the finished bag?
In most cases, handmade finished items can be sold, but avoid copying another maker’s photos, wording, or exact branding.
How long does it take to make?
This may take a few hours depending on your crochet speed, yarn thickness, and whether you add lining or a closure.