
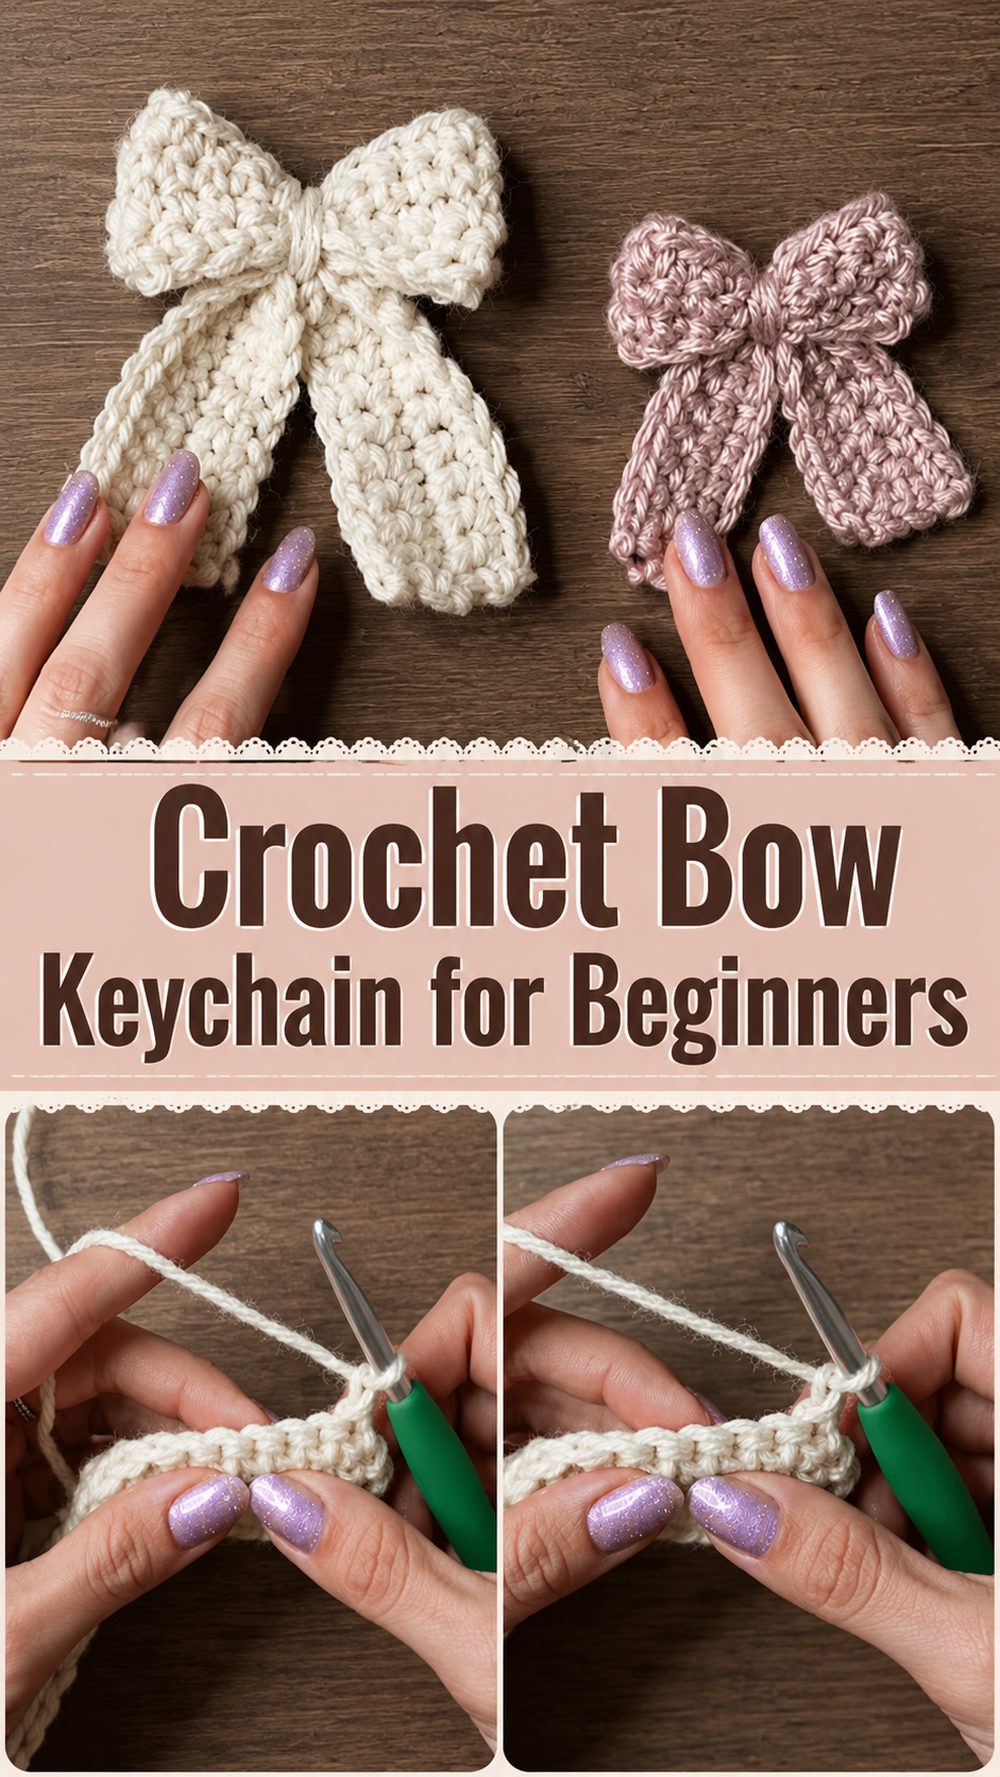
A crochet bow is one of those little, sweet projects that feels useful the minute you finish it. You can turn it into a keychain, sew it onto a bag, put it onto a baby headband, decorate a gift or use it as a cute applique on another crochet piece. This beginner-friendly bow is made from simple crochet rectangles, a lovely project if you are still practicing neat rows and even stitches. The finished look is soft, neat and playful with a gathered centre giving that classic bow shape. It also knits up quickly and uses very little yarn which makes it great for scraps. Once you learn the basic construction, you can make it wider, longer, smaller, chunkier, or more delicate, according to your style.
Why You’ll Love This Project:
This crochet bow is quick, easy and surprisingly versatile. It’s a great little project for beginners as it uses basic stitches and easy shaping, but the finished product still looks polished and gift-worthy. Depending on your speed you can make one in a few hours or less. It’s a lovely way to use up leftover yarn from other projects.
Materials:
Medium weight yarn or any yarn that makes the bow look the way you want
A crochet hook that matches your yarn.
For the scissors,
Needle for yarn
Optional: key ring or keychain clasp
Measuring tape (optional)
Choose a yarn and hook size to give you the look and fit you want.
Best Yarn for This Project:
Medium weight acrylic yarn is a good choice for a sturdy everyday bow as a keychain or bag charm. Cotton yarn is also a nice choice as it gives the bow a nice shape and clean stitch definition. Opt for pastel acrylic or cotton blend yarn for a softer, sweeter look. If you want a tiny bow, use thinner yarn and a smaller hook. For a bolder statement bow use a heavier weight yarn and larger hook.
Expert:
It’s an easy project for beginners. All you need to know is how to make a chain and single crochet in rows. The assembly is the trickiest part, but it’s still simple once you get the hang of how the pieces fold and wrap together.
Size & Fit Guide:
The tutorial bow is small enough to look great as a key chain or applique. The finished bow shown here is about 7.5 cm wide by 9 cm long, but the size is easily adjustable. Start with more chains to make it wider. Make it less wide . Use less chains . Add additional rows for a longer or fuller bow. For a smaller daintier bow work fewer rows or use thinner yarn.
Stitches:
Chain
Single crochet stitch
Basic sewing with yarn needle
Assembly wrapping and binding
How to Prepare:

Stage 1: Lay the Groundwork
The bow begins with a simple chain. This chain controls the width of the top of our bow, so think of this as the side to side measurement once the piece is folded and shaped. Chain your starting chain . Then single crochet across the row . Keep your tension relaxed but firm. If your chain is too tight the edge may pull in and make the bow look lopsided.
Step 2: Crochet the 1st Rectangle
After the first row, work back and forth in single crochet. Chain 1 at the beginning of each row, turn and single crochet across. This forms a little neat rectangle. The tutorial uses a short rectangle for the top bow section, but you can change this easily. More rows will make a fuller and taller bow, while fewer rows will make a slimmer bow.
When this first rectangle is done, leave a long yarn tail before cutting. This long tail is important as we will use it later for sewing and wrapping the center of the bow.
Step 3: Create the Second Rectangle
Now create a second rectangle in the same way. This piece is the tail section of the bow. Try to keep your stitches and tension close to the first piece so that both parts look balanced when layered together. The second piece does not need the same extra-long tail unless you want more yarn to tie out with. Weave the short ends in neatly so the back of the bow is clean.
Step 4: Creating the top bow piece
Take the first rectangle and fold the two short ends together to make a loop or ring shape. Join the ends using the long yarn tail and yarn needle. When joined flatten the piece with the seam at center back. This keeps the join hidden and helps the front of the bow to look smooth.
Now pinch or gather the centre of the flattened loop. Wrap the long yarn tail around the middle a few times. As you finish wrapping the rectangle begins to pull in and take the pretty bow shape. Wrap firmly, but not so firmly that the stitches are distorted. When the center looks nice, secure the yarn.
Step 5: Attaching the Bow Tail Piece
Position the second rectangle behind the gathered bow piece. Slightly fold or pinch the top center of the tail piece so it tucks nicely under the main bow. Carefully center both pieces and wrap them together. This is when it begins to look complete, so take a moment to adjust the layers so that both sides look even.
Again , wrap around the center with the remaining yarn tail . Be sure to catch both the top bow and the tail piece . wrap until the center feels secure and the shape can stand on its own Tie tightly at the back. If the bow looks a little wonky, just gently pull the corners and smooth the stitches with your fingers.
Step 6: Add the Keychain Loop
To make the bow into a keychain, slide the keyring or clasp through the wrapped center at the top of the bow. The wrapped yarn provides a natural place to hold the clasp. Make sure it is tight and not yanking hard on a strand. If necessary, tack a few more stitches in the back with your yarn needle to secure everything down.
Step 7. Finish the Bow
Carefully work in all the loose ends on the back side. When the ends are secure, cut off any excess yarn. With your fingers, shape the bow, pulling gently on the corners so that the top part looks even. The last bow should be a soft rectangular top, with a gathered middle and a neat lower tail. It should be cute, a little stuffed and ready to go as a keychain, applique or decoration.
Useful Tips:
If you have trouble keeping your row edges straight, use stitch markers. Try to get the same tension on both rectangles so the bow looks even. Before you tie the final knot, check the front of the bow and correct the center wrap if necessary. Cotton gives a crisp look, and acrylic gives a softer look. For a neater finish thread the ends into the wrapped centre at the back.
Mistakes to avoid:
Tightening the initial chain too much (which may curl the edge)
Leaving a long tail to wrap the center (and forgetting to).
Wrapping the middle to loose so the bow doesn’t hold its shape
Squeezing the centre too tight and squashing the stitches
Then wrapping both pieces together not matching the tail piece.
Cutting the yarn ends before the bow is secure
Customisations Ideas:
Coordinate this bow with a bag, outfit, baby accessory or gift wrap in any colour. For a sweet look, try soft pink, cream, red, lavender or pastel blue. To dress it up a bit, add a button, pearl bead or small charm to the center. You can make a bigger bow for a hair clip, a tiny bow for amigurumi, or a longer bow for a ribbon style effect. To make it even more fun, use a variegated yarn or make the top piece and the tail piece in different colours.
Style Suggestions:
The finished bow is perfect as a keychain, bag charm, hair ornament, baby headband decoration, gift topper, or as an applique for hats, cardigans, blankets and tote bags. A matching set of bows makes a lovely handmade gift. You can make several in seasonal colours such as red and green for Christmas, orange and brown for autumn or soft pastels for spring.
Care Instructions:
If the bow becomes dirty, especially if it is attached to a bag or keychain, hand wash it gently. Press out excess water with a towel. Use mild soap and cool water. Lay flat to dry, reshaping bow while damp. Avoid high heat, especially with acrylic yarn, as it can damage or flatten the fibres.
Time Required:
Depending on your speed, yarn, size and stitch pattern this can take a couple of hours. Once you get the hang of the construction smaller bows can work up pretty fast.
Conclusion:
This easy crochet bow is a lovely little project for using leftover yarn and practicing simple stitches. It is beginner-friendly, quick to customize, and useful in so many ways. Make one as a keychain, sew one onto a handmade gift, or create a whole batch in different colors. Once you try the basic version, you can adjust the size, yarn, and finishing details to match your own style.
FAQs:
Is this crochet bow beginner-friendly?
Yes. It is a great beginner project because it mainly uses chains and single crochet rows.
What yarn is best for a crochet bow?
Cotton gives a neat, crisp bow, while acrylic makes a soft and lightweight bow. Medium-weight yarn is a good place to start.
Can I adjust the size?
Yes. Add more chains for a wider bow, fewer chains for a smaller bow, and change the number of rows to adjust the height.
Can I use this as a hair bow?
Yes. Instead of adding a keyring, sew or glue the finished bow onto a hair clip, hair tie, or headband.
Can I sell the finished bow?
In most cases, handmade finished items can be sold, but always follow the tutorial creator’s usage rules if they provide any.