
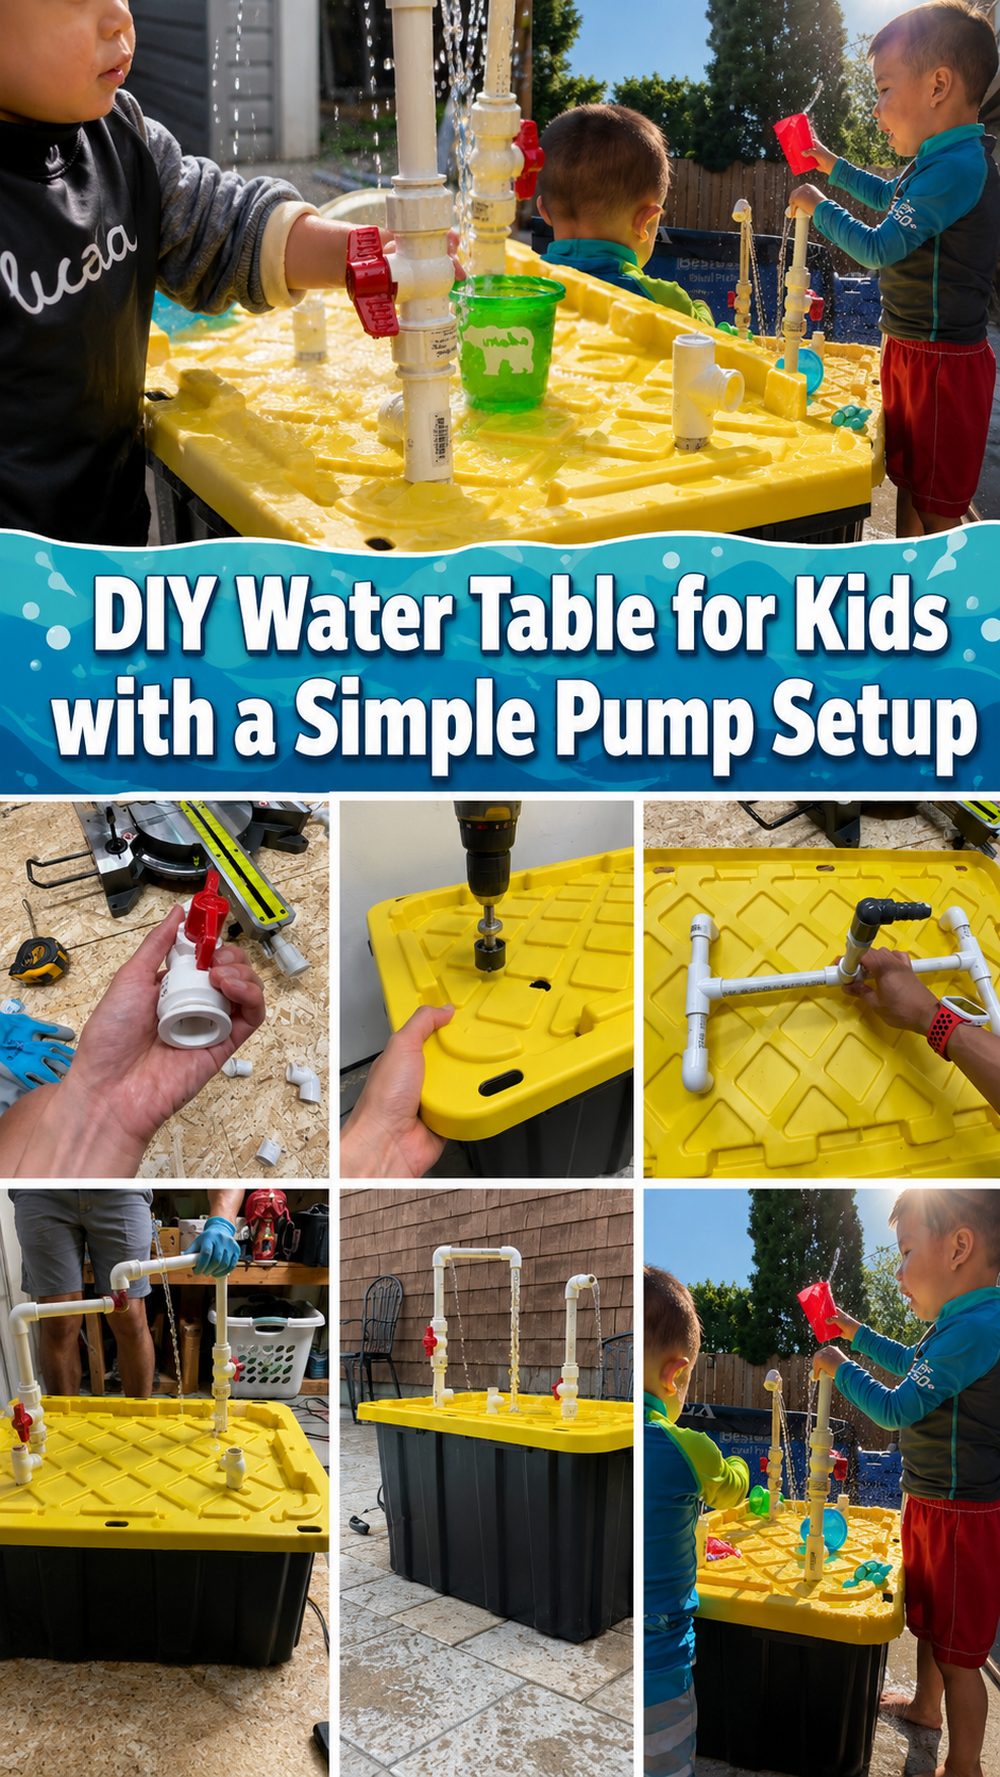
A homemade water table is such a fun way to bring outdoor play into your backyard, patio, or garden without needing a big budget. This version uses plastic bins and a basic pump-style setup to create flowing water play that keeps kids busy scooping, pouring, splashing, and experimenting. It is a great project for warm days, sensory play, and casual family afternoons outside. What makes this idea especially appealing is that it feels playful and creative while still being simple enough for a confident beginner to make at home. You can keep it very basic or dress it up with extra cups, funnels, and toys your child already loves. The overall build is approachable and flexible, so you can adjust it to fit your space and the age of your kids.
Why You’ll Love This Project:
This water table is playful, practical, and easy to customize. It gives kids an engaging place to pour and explore water while using simple materials that are easy to find and adapt to your own yard or patio.
Materials Needed:
- Large plastic storage container or bin
- Smaller plastic bin or tub
- Water pump or simple circulating water setup
- PVC pieces or tubing if needed for water flow
- Fasteners or support pieces as needed
- Water-safe adhesive or sealing materials if needed
Use similar materials that match the look, size, and style you want.
Tools Needed:
- Drill or cutting tool for openings if needed
- Measuring tape
- Marker
- Basic assembly tools
- Basic household or craft tools are enough for finishing and setup
Best Materials for This Project:
For a kids’ water table, sturdy plastic bins work especially well because they are lightweight, easy to clean, and simple to move when needed. If you are adding any tubing or pipe sections, choose water-safe pieces that are easy to rinse out. For outdoor use, materials that can handle splashes and sunshine are the best choice.
Skill Level:
Beginner-friendly to easy. The overall design is simple, and most of the work comes down to arranging bins, creating a stable setup, and connecting the water feature in a practical way.
Size and Placement Guide:
You can make this water table taller or lower depending on your child’s age. A wider bottom bin gives more splash space, while a smaller upper section helps direct the water flow. Place it on a level patio, deck, or grassy spot where a little water mess is not a problem. If your yard gets strong sun, a partly shaded area can make playtime more comfortable.
How to Make It:

Step 1: Prepare the Base
Start with your main large plastic bin or container. This acts as the lower part of the water table and catches the water during play. Clean it well and test where you want the upper section to sit. Make sure the whole setup feels stable before you build anything else.
Step 2: Arrange the Pieces
Set the smaller bin above or slightly inside the larger setup, depending on the style you want. The tutorial uses a storage container and an additional smaller plastic bin, creating a layered play area that lets water move from one section to another. Adjust the position until it looks balanced and easy for kids to reach.
Step 3: Build the Shape
Add the support or flow pieces needed for the water feature. This may include PVC pipe or tubing to help move water where you want it. Keep the design simple and focus on making the path of the water easy to follow. Test-fit everything before securing it permanently.
Step 4: Add the Pump or Water Flow
The featured tutorial includes a pump-based setup, which helps keep the water moving and makes the table more interactive. Position the pump so it can recirculate water safely and neatly. Check that the water lands back into the bin and does not spray too far outside the play area.
Step 5: Add Color or Texture
At this stage, you can leave the table plain for a clean, practical look or add fun extras like scoops, cups, floating toys, funnels, or little water-safe accessories. Keep the layout open enough for play and avoid overcrowding it.
Step 6: Finish and Style
Fill the table with a comfortable amount of water and test the full setup. Make any adjustments so the bins sit securely and the water flows the way you want. Once it works smoothly, place it in your chosen outdoor spot and add a few simple toys to make it even more inviting.
Helpful Tips:
- Test the layout before securing anything
- Keep the setup low and stable for safer play
- Check water flow before letting kids use it
- Use containers that are easy to rinse and refill
- Keep extra splash toys nearby for variety
Common Mistakes to Avoid:
- Skipping a stability check before filling with water
- Using bins that are too flimsy
- Making the upper section too high for small children
- Letting the water spray too far outside the table
- Adding too many accessories and crowding the space
- Forgetting to clean and dry the setup after use
Customization Ideas:
Try a brighter bin color, add funnels or measuring cups, use floating toys, or create themed play with boats, ducks, or nature items like smooth stones. You can also make it more neutral and simple so it blends nicely into your garden space.
Style Ideas:
Set the finished water table near an outdoor play area, under a shade umbrella, or beside a mud kitchen for a fun backyard activity zone. It also works well for playdates and summer birthdays.
Care Instructions:
Empty and rinse the table after use, especially in hot weather. Wipe the bins clean, check the pump regularly, and store smaller accessories in a dry basket. If you leave it outdoors, refresh the water often and keep the setup clean.
Time Needed:
This project may take a short afternoon or a few hours depending on your materials, size, drying time, and detail level.
Budget Guide:
This can be a fairly affordable DIY, especially if you already have plastic bins, leftover tubing, or simple water-play accessories at home.
Conclusion:
This DIY water table is a fun and practical project that turns simple materials into a playful outdoor activity kids can enjoy again and again. You can keep it basic or personalize it to match your space, your budget, and your child’s favorite way to play. The best part is that it feels homemade, useful, and full of summer fun.
FAQs:
1. Is this beginner-friendly?
Yes, the build looks approachable and uses simple materials with an easy overall layout.
2. What materials are best?
Sturdy plastic bins and water-safe tubing or pipe pieces are a great place to start.
3. Can I make it bigger or smaller?
Yes, you can scale the bins and the layout to fit your child’s age and your outdoor space.
4. Can I use recycled materials?
Yes, clean storage containers and spare water-play pieces can work well if they are sturdy and safe.
5. Can I use it outdoors all summer?
Yes, but it is best to empty, rinse, and check it regularly so it stays clean and ready for play.