

If you’re looking for a simple outdoor project that will make a big impact, this DIY cinder block bench is a great place to start. It gives you more seating, adds a sleek modern design and is functional in a backyard, on a patio, beside a garden bed or even along a porch wall. I am especially drawn to this project because it is so accessible.
I picked a tutorial where you can see a bench using cinder blocks and wood boards and it is designed so that you do not need any power tools to put it together.
That makes it a great option for beginners, renters, budget decorators, or anyone who wants an outdoor upgrade without a complicated build. The finished bench looks sturdy and functional, and easy to customise for your own space.
Why You’ll Love This Project:
This is a practical and beginner friendly bench that looks affordable. This easy design is quick to make in an afternoon but still adds a finished and stylish touch to your outdoor space.
What you will need:
Concrete Block
Wood seats for boards seat
Additional hold outdoor safe adhesive if desired
Sanding sponge or sandpaper to smooth rough spots
Optional: Outdoor paint or sealant
Use similar materials to get the look, size and style you want.
Tools Required:
You just need a few basic household or DIY tools. The video is to be taken as a no power tools project.
Materials Recommended for This Project:
Standard cinder blocks are good because they are sturdy, easy to find and strong enough to use outside. For the seat, pick solid boards that you figure are straight and sturdy. If it is going to be outside full time, outdoor rated wood and a weather-friendly finish will help the bench last longer. Once the structure is finished, put a bench cushion on it to make it look softer.
Skills:
For beginners. The project is easy to build and is designed to be built without power tools which makes it less intimidating for first time DIYers.
Sizing & Placement Guide:
The bench can be made shorter or longer by changing the length of the board and the number of support blocks. A shorter version is perfect for a porch or balcony, a longer version works great for a patio or garden seating area. For a modern look, leave the colour natural, or paint the blocks to match your outdoor decor. Set it down on a flat and steady surface so that it feels stable and even.
How to Make It:
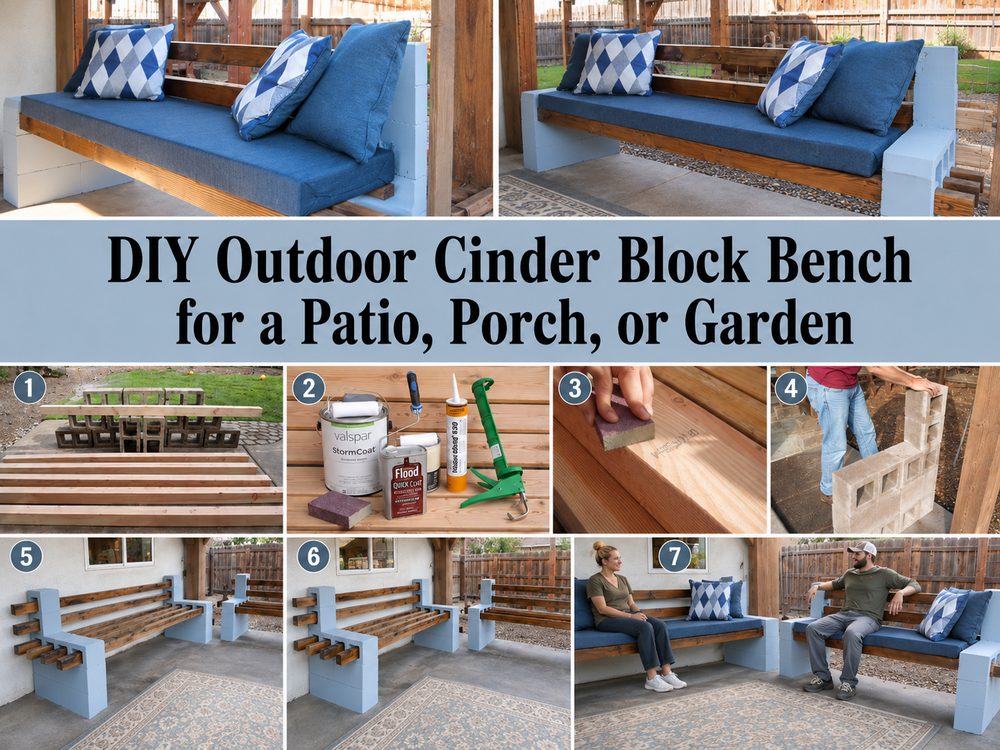
Put together the base
First, find a flat area where the bench will go. Make the space clear and spread out the blocks to see what shape they will make. Check that the blocks are sitting evenly after the sweep. Any edges that feel rough should be a little smoothed out before putting it all together.
Put the pieces in the right order.
As shown in the video, put the cinder blocks together to make a bench shape. Because the blocks are what hold the structure together, take your time and make sure both sides are even. Check the height and space between the boards, then take a step back and put the wood down.
Make it.
Once you’re happy with how the blocks are laid out, start stacking and positioning them to make the final bench shape. It needs to be level for the seat boards to be level across the supports. It will be more stable if you put some glue that is safe for outdoor use between the contact points. Just make sure to keep the layout neat and straight.
Fourth, fix the seat boards.
A cinder block base can be used to slide or set wood boards on. Make sure the seat is level and comfortable. Make sure the boards stay flat and don’t move. The project looks like it will be done quickly from there.
Add colour and texture.
For an industrial-modern look, leave the wood and blocks as they are. For a softer garden style, paint and stain them. The bench looks better because of the darker stain. Painting it white, black, or earthy will make it look good outside.
Add some flair
Put outdoor cushions on the bench, a throw pillow, or planters close by. Based on the season, you can keep it simple or get fancy. Put pots or lanterns that match on either side of it to make the corner feel more put together.
Finish and style
Make sure the bench is level and stable. When it’s ready, put it in its final place and decorate the area around it. It looks good next to a garden path, under a window, on a front porch, or in a seating area on a patio.
Tips That Will Help:
Check out your plan before you make it.
It works best when used on a flat surface.
Pick boards that look pretty solid and straight.
Before you use the paint, stain, or glue, let it dry all the way through.
If you are putting it on soft flooring, don’t forget to add felt pads or base protection.
Top Mistakes to Avoid:
Place the bench on rough ground
Getting boards that are too weak or too thin
running through the layout, not a tick on the balance
Finishes that aren’t safe for outdoor use on exposed materials
Putting on decorations before the glue or paint is dry
Not big enough for the area around the bench
Some ideas for customisation:
You can paint the blocks, change the colour of the wood, add a back cushion, use brighter pillows, or make two benches that go together. You can make it look even better by adding lanterns, planters, or outdoor string lights nearby.
Style tip:
This bench is great for a front porch, a garden corner, or a patio with a small side table for a casual place to sit. It looks good next to raised beds or along a fence where you want something simple that looks good and works well.
Take care of the product
Often dust or brush. If you have to, wipe the wood down gently. If you leave the bench outside all year, you may need to reapply the finish. If the weather gets bad, bring the cushions inside. Also, make sure that everything is level and secure every once in a while.
How Much Time:
Depending on the size, time it takes to dry, and level of detail, this project could take a few hours or a short afternoon.
Budget: A Look
Simple, easy-to-find materials and no complicated tool setup make this an outdoor project that can be done on a budget.or project because it uses simple, easy-to-find materials and doesn’t require a complex tool setup
Conclusion:
This DIY outdoor bench is a great example of how a simple project can still make your space feel more welcoming and put together. It is practical, stylish, and easy to adapt to your own patio, porch, or garden style. Try it in a finish and size that suits your space, and make it your own.
FAQs:
Is this beginner-friendly?
Yes. It is a simple build and the tutorial presents it as a no-power-tools project.
What materials work best?
Cinder blocks and sturdy outdoor-friendly boards are the easiest and most durable choice.
Can I make it bigger or smaller?
Yes. Adjust the board length and overall layout to suit your space.
Can I use recycled materials?
Yes. Reused boards can work well as long as they are clean, solid, and suitable for outdoor use.
Can I use it outdoors year-round?
Yes, but it will last better with weather-friendly finishes and occasional maintenance.