

A DIY hammock stand is a great way to enjoy a relaxing outdoor spot even if you do not have the perfect trees in your yard. This project creates a freestanding wooden stand that looks clean, feels sturdy, and gives you more freedom to place your hammock where it fits best. It is a nice choice for patios, decks, gardens, and open backyard corners where you want a cozy place to unwind. The tutorial I based this on shows an easy woodworking approach with a simple design that does not feel overly complicated or expensive. It is a fun build for anyone who likes practical outdoor projects and wants something useful that also adds charm to the space. The finished stand has a strong, handmade look that works with both casual and styled outdoor decor.
Why You’ll Love This Project:
This hammock stand is practical, attractive, and much easier to place than a tree-mounted hammock. It gives you a relaxing outdoor feature while also letting you customize the size, finish, and overall style to match your yard.
Materials Needed:
- Structural lumber for the main frame
- Wood for cross supports or braces
- Strong bolts, washers, and nuts
- Exterior screws
- Hammock hooks or hanging hardware
- Sandpaper
- Outdoor wood stain, sealer, or paint
Use similar materials that match the look, size, and style you want.
Tools Needed:
- Saw
- Drill/driver
- Measuring tape
- Sander or sanding block
- Wrench or socket set
- Pencil
- Clamps if helpful
Best Materials for This Project:
For a hammock stand, strong outdoor-safe lumber works best. Solid framing boards are a smart choice because they can handle weight better than thin decorative wood. Use exterior-rated hardware so the stand holds up better outside. If you want a cleaner finish, choose smoother boards and sand them well before assembly. For long-term use, add a weather-protective finish that suits your climate.
Skill Level:
Confident beginner to easy intermediate. The build is straightforward, but careful measuring, solid assembly, and safe hardware placement matter for a strong result.
Size and Placement Guide:
Adjust the length of the stand to suit your hammock style and the space you have available. A larger yard can handle a wider footprint, while a patio may need a more compact version. You can keep the wood natural for a rustic look, stain it darker for a modern outdoor style, or paint it to match your furniture. Place it on a flat, stable surface with enough room around both ends so the hammock hangs comfortably and safely.
How to Make It:
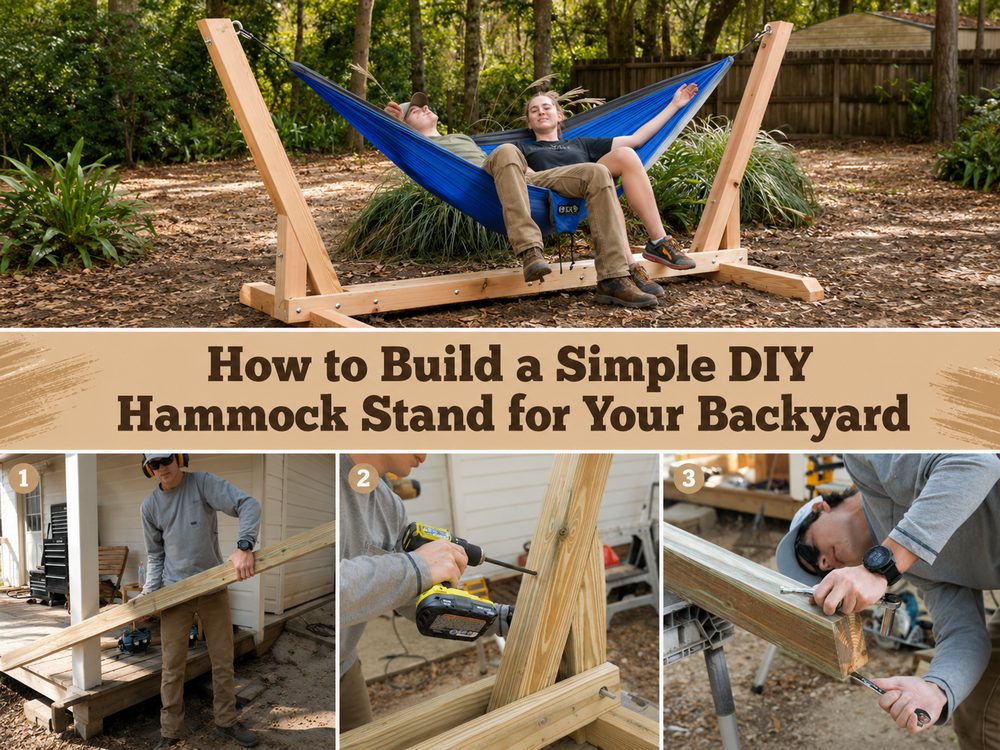
Step 1: Prepare the Base
Start by measuring and cutting your lumber for the main frame pieces. Lay everything out on the ground first so you can check the overall shape before fastening anything together. Sand rough edges early to make the build easier to handle and to give the stand a cleaner final look.
Step 2: Arrange the Pieces
Position the long base sections and the upright or angled support pieces according to the design. The tutorial uses a simple freestanding layout, so the goal is to create a balanced frame that can support the hammock without needing nearby trees. Check that both sides mirror each other before moving on.
Step 3: Build the Shape
Attach the main structural pieces together, working one side at a time. Use bolts or sturdy fasteners where the frame needs extra strength. Keep checking alignment as you go so the stand stays even. Once both ends are assembled, connect them with the center support pieces to form the full stand.
Step 4: Add Support and Stability
Install braces or support members anywhere the frame needs reinforcement. This part helps reduce wobble and makes the stand feel more secure. Tighten all hardware carefully and recheck the balance of the structure on the ground. A level and symmetrical frame will look better and perform better.
Step 5: Add Color or Texture
Once the stand is assembled, sand it again where needed. Then apply stain, paint, or a clear sealer depending on the look you want. Let each coat dry properly before handling. A sealed finish is especially helpful if the stand will stay outdoors.
Step 6: Decorate
Add the hanging hardware at both ends, making sure the placement suits your hammock and allows a comfortable curve. Keep the styling simple or dress it up with an outdoor rug, side table, string lights nearby, or a few planters around the base.
Step 7: Finish and Style
Hang the hammock, test the setup gently, and make any small adjustments needed. Move the stand into its final spot and style the area so it feels inviting. This kind of project works well as a backyard relaxation zone and can become a favorite summer feature. The selected tutorial presents it as an easy, low-cost woodworking project built from a fresh redesign.
Helpful Tips:
- Measure carefully before cutting any wood
- Dry-fit the frame before final assembly
- Sand before and after building for a neater finish
- Use exterior-rated hardware for outdoor use
- Test the hanging position before final tightening
- Let stain, paint, or sealer dry fully before use
Common Mistakes to Avoid:
- Cutting boards before checking the full layout
- Using weak or non-outdoor hardware
- Skipping support braces
- Not checking that both sides match
- Hanging the hammock before the finish has cured
- Placing the stand on uneven ground
Customization Ideas:
Change the stain color, use a brighter painted finish, add decorative rope details, place planters nearby, or style it with outdoor cushions and throws. You could also make it feel more rustic, coastal, modern, or farmhouse depending on your patio decor.
Style Ideas:
Place the finished stand near a garden bed, beside a deck, on a gravel patio, or in a shaded backyard corner. It also looks lovely paired with lanterns, a small outdoor table, and soft neutral textiles for a calm retreat.
Care Instructions:
Dust or wipe the stand down occasionally. Reapply outdoor sealer when needed, especially if it stays outside through changing weather. Check the bolts and hanging hardware from time to time to make sure everything stays tight and secure.
Time Needed:
This project may take a short afternoon or a few hours depending on your materials, size, drying time, and detail level.
Budget Guide:
This can be a fairly budget-friendly outdoor build, especially if you keep the design simple and use easy-to-find lumber and hardware. The chosen tutorial specifically presents the stand as a simple project that does not cost a lot.
Conclusion:
A DIY hammock stand is one of those projects that feels both useful and rewarding. It gives you a relaxing place to enjoy the outdoors while adding a handmade feature to your space. With strong materials, careful assembly, and a finish that suits your style, you can create a stand that looks great and works beautifully all season.
FAQs:
1. Is this beginner-friendly?
Yes, for a confident beginner who can measure carefully and use basic woodworking tools.
2. What materials are best?
Strong structural lumber and outdoor-rated hardware are the best choices for durability.
3. Can I make it bigger or smaller?
Yes, you can adjust the size to fit your hammock and outdoor space.
4. Can I use recycled materials?
You can, as long as they are clean, solid, and strong enough for a weight-bearing build.
5. Can I use it outdoors all year?
Yes, but it will last better with an outdoor finish and regular hardware checks.