

A small crochet pouch is one of those projects that feels extra satisfying because it is quick, useful, and honestly just adorable to keep in your bag. This cute version has a sweet handmade look and works well for coins, earbuds, stitch markers, lip balm, or other tiny essentials. In the selected tutorial, the pouch is made with two granny squares, then finished with a flap and button closure, which gives it that charming little vintage feel while still being practical for everyday use. It is the kind of project that suits beginners who want to try something beyond a basic swatch, but it is also fun for experienced crocheters who enjoy fast handmade gifts.
Why You’ll Love This Project:
This little pouch is fun because it gives you a finished item you can actually use right away. It is small enough to make in a relaxed sitting, cute enough to gift, and simple enough to personalize with your favorite colors, button style, and finishing touches.
Materials Needed:
- Yarn
- Crochet hook
- Scissors
- Yarn needle
- Button
- Measuring tape
- Stitch marker if helpful
Use a yarn and hook size that matches your desired fit and texture.
Best Yarn for This Project:
A smooth yarn with good stitch definition works nicely for a pouch like this because it helps the granny-square pattern look neat and keeps the shape tidy. Soft cotton or a cotton blend is a lovely choice if you want the pouch to feel sturdy and crisp. If you want a softer, slightly cozier finish, a light acrylic or acrylic blend can also work well.
Skill Level:
Beginner-friendly to easy. The tutorial uses a simple pouch construction built from granny-square pieces, so it is a nice project for someone who already knows the basics of chaining and working simple stitches. The finishing steps are also manageable, especially if you have already practiced seaming once or twice.
Size and Fit Guide:
Because this is a small pouch, you can adjust the size quite easily. Make your squares a little larger if you want more room inside, or keep them compact for a coin-size pouch. It helps to place your small items on top of one finished square while you work so you can judge whether the final pouch will be wide and tall enough. You can also lengthen or shorten the flap depending on how much overlap you want for the button closure.
Stitches Used:
- Chain
- Slip stitch
- Double crochet granny-square style stitches
- Simple joining stitches
The selected tutorial clearly shows a pouch made from granny squares with a flap and button finish, so the stitch pattern stays approachable and decorative at the same time.
How to Make It:
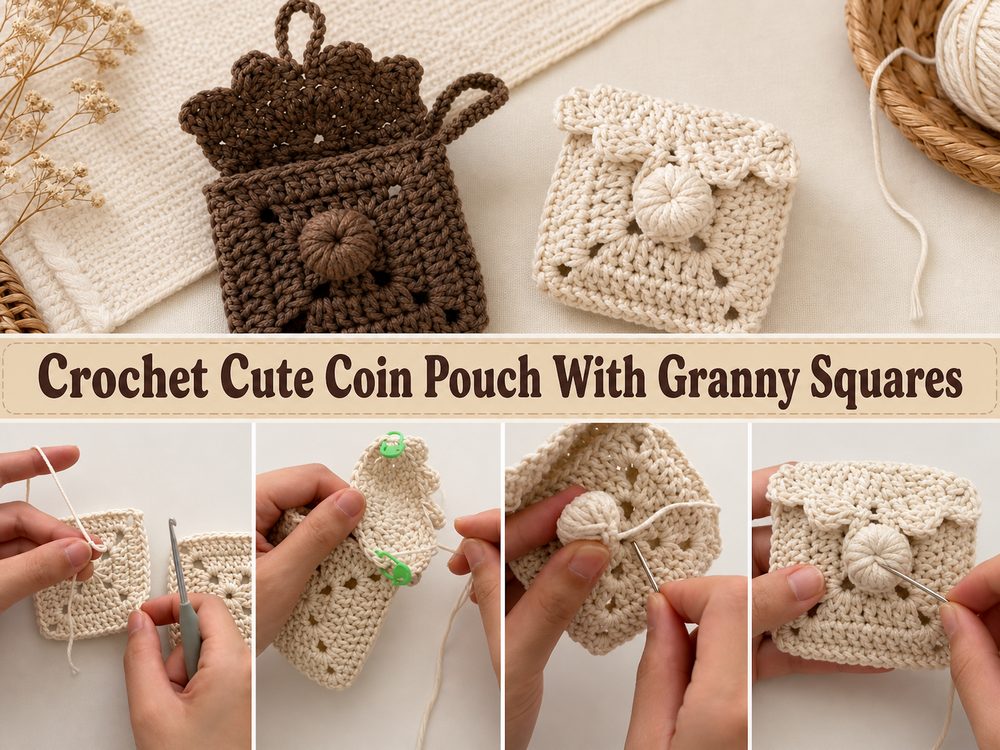
Step 1: Start the First Granny Square
The pouch begins with the first square. This is the front of the pouch, so this is where you can enjoy your prettiest color choice or a playful color combination if you want the pouch to look extra cute. Work the granny-square pattern from the center outward, building it round by round until the square reaches the size you want for the pouch.
Try not to rush this part. Since the whole pouch is based on the shape of the two squares, it helps to keep your corners neat and your tension fairly even. That will make the joining much easier later.
Step 2: Make the Second Square
Next, make a second granny square to match the first one. This becomes the back of the pouch. It is important that both pieces are as close in size as possible, because uneven squares can make the pouch pull to one side or make the opening look crooked.
A helpful trick is to lay the second square directly over the first one once you finish it. If one looks slightly tighter or looser, you can gently adjust your tension on the final round or block the pieces lightly before joining.
Step 3: Shape the Pouch Body
Once both squares are ready, place them together with the right sides facing the way you want. Join around the sides and bottom, leaving the top open so the pouch can hold your little items. The idea in the tutorial is very simple and practical: the pouch body is formed from the two granny squares, then finished with a flap and button.
You can seam the pieces in a way that looks clean from the outside or use a slightly decorative join if you want the edges to stand out more. Just make sure the top remains open and easy to access.
Step 4: Add the Flap
After the main pouch shape is joined, the flap is worked so the pouch can close neatly. The flap gives the project its sweet little coin-purse style and makes it feel more finished. In a project like this, the flap is usually built from one side of the pouch opening and worked until it folds over comfortably.
You do not need to obsess over exact row numbers if they are not important to your own size. Just continue until the flap reaches far enough to sit nicely over the front.
Step 5: Make the Button Closure
The tutorial includes a button closure, which adds both function and charm.
Once your flap is long enough, create a loop that can slip over the button comfortably. The loop should not be too tight or too loose. Test it before fastening off. A snug but easy fit is best, especially if you plan to open and close the pouch often.
Sew the button onto the front of the pouch in a position that lines up naturally with the loop. Before securing it fully, check that the flap sits centered.
Step 6: Finish and Tidy the Edges
When the pouch is assembled, weave in all loose ends carefully. Since this is a small item that will be handled a lot, secure the tails well so they do not work themselves out later. You can also smooth the shape with gentle blocking if your squares need help lying flat.
The final result should look like a compact, cute little pouch with a decorative front, a matching back, and a flap closure that keeps everything tucked inside. It is simple, sweet, and very giftable.
Helpful Tips:
- Keep both granny squares the same size for a neater pouch.
- Test the flap length before fastening off.
- Check the button loop fit before sewing on the button.
- Use cotton yarn if you want the pouch to feel more structured.
- Use a stitch marker at the first stitch of each row or round if that helps you stay organized.
- Weave in ends firmly because small pouches get opened and handled often.
Common Mistakes to Avoid:
- Making the front and back squares different sizes
- Pulling the joining stitches too tightly
- Leaving too small an opening at the top
- Making the flap too short to close comfortably
- Using a button that is too large or too tiny for the loop
- Forgetting to test the closure before finishing the pouch
Customization Ideas:
You can make this pouch look completely different just by changing the colors. Try soft pastels for a delicate look, bright scraps for a cheerful stash-busting project, or a single neutral shade for something simple and classic. You can also switch the button style, add a tiny bow, use contrast edging, or make a longer flap for a slightly different shape. If you want a roomier pouch, simply make larger granny squares before joining.
Style Ideas:
This kind of pouch is lovely for keeping in a tote bag, using as a coin purse, holding jewelry while traveling, or organizing little crochet notions. It also makes a sweet handmade gift for a friend, teacher, or craft-loving family member. You could even tuck a gift card or small treat inside before giving it away.
Care Instructions:
Hand wash gently if needed and reshape while damp. Lay flat to dry and avoid high heat, especially if your pouch has a sewn-on button. If the pouch softens too much after washing, a light reblocking can help restore the shape.
Time Needed:
This may take a few hours depending on your speed, yarn, size, and stitch pattern.
Credit By: Cloud Pusher
https://www.youtube.com/watch?v=mkWGy1DTgWY
Conclusion:
If you are in the mood for a small project that is both cute and useful, this crochet pouch is a lovely one to try. The granny-square base keeps it classic, while the flap and button make it feel polished and practical. You can keep it simple or turn it into something really personal with your own colors and finishing touches. It is the kind of project that is easy to enjoy and easy to make again.
FAQs:
1. Is this project beginner-friendly?
Yes. It is a good beginner project for someone who already knows the basic crochet stitches and wants to make a useful item.
2. What yarn works best for this pouch?
Cotton or cotton-blend yarn is great if you want a tidy, slightly structured finish.
3. Can I make it bigger?
Yes. Just make the granny squares larger before joining them into the pouch.
4. Can I use it for more than coins?
Absolutely. It is also handy for earbuds, lip balm, small jewelry, stitch markers, or other tiny essentials.
5. How do I make the closure more comfortable to use?
Test the loop on the button before finishing. A closure that slips on easily but still feels secure works best.