
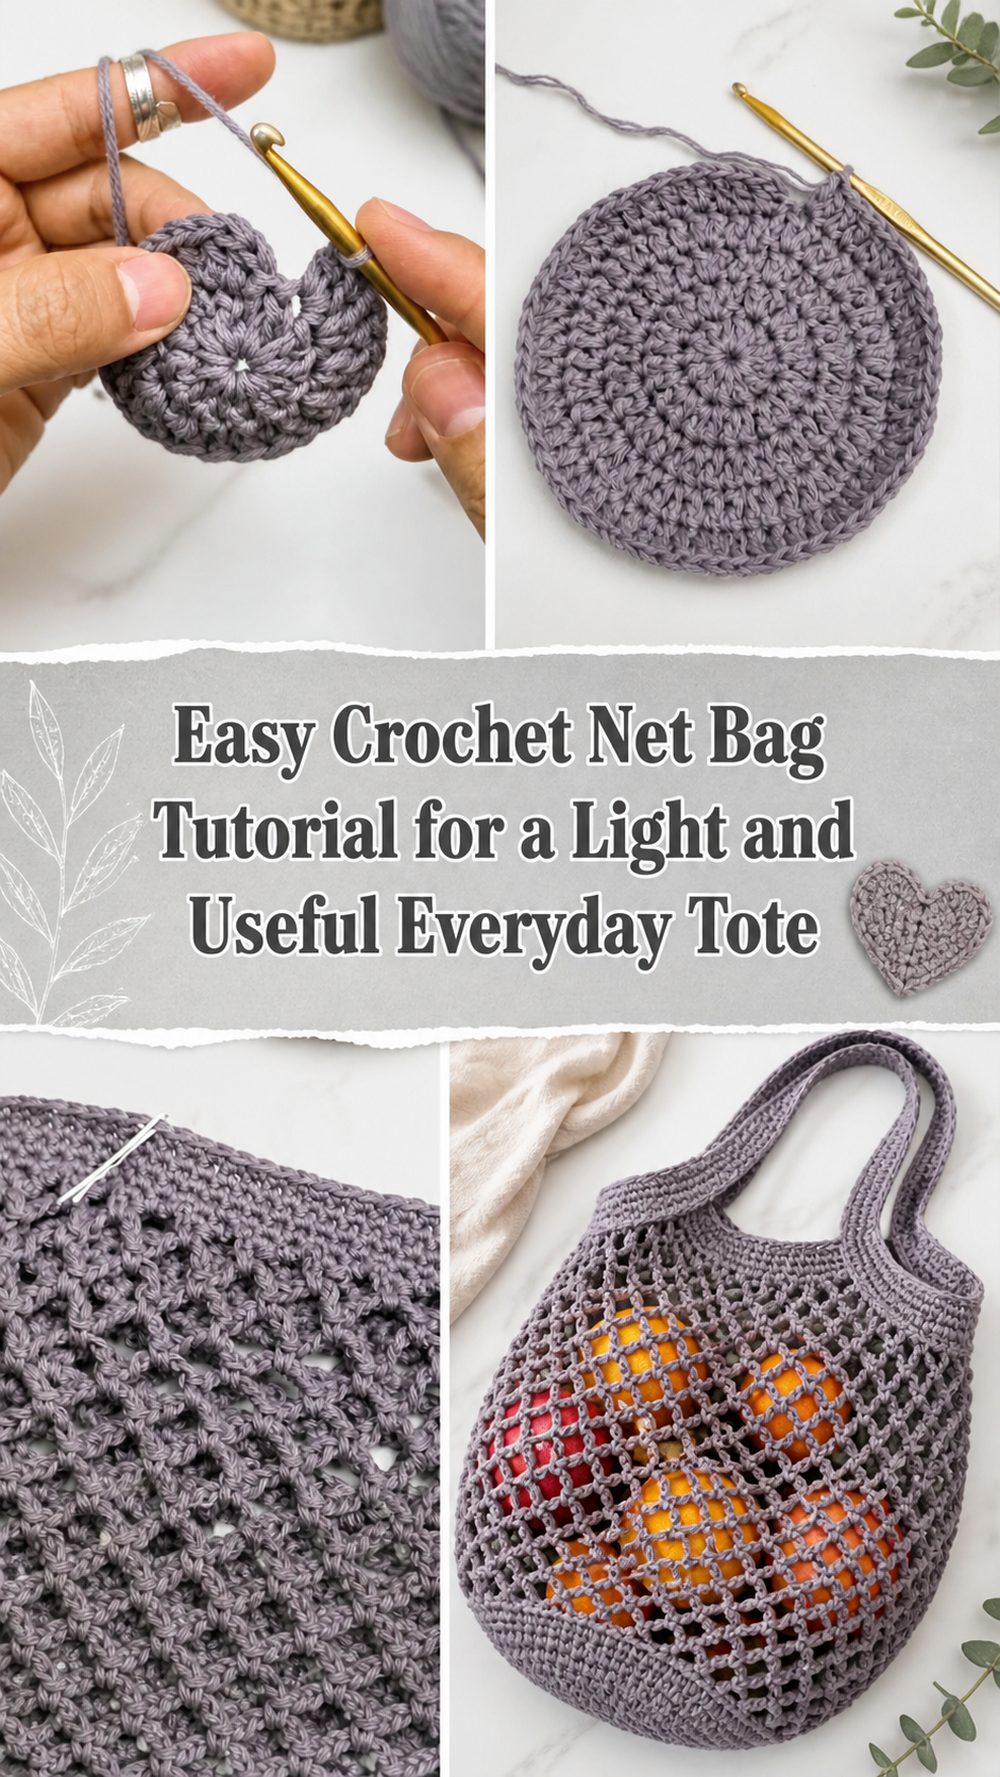
A crochet net bag is one of those projects that feels simple, practical, and surprisingly fun all at once. It works beautifully as a shopping bag, a casual tote, or an easy grab-and-go piece for carrying fruit, yarn, beach items, or everyday bits and pieces. The open mesh gives it that relaxed handmade look, while the stretchy fabric helps the bag hold more than it seems to at first glance. This kind of project is especially nice if you want something useful without making anything too heavy or bulky. It is also a great choice for crocheters who enjoy repetitive stitches and watching a project grow quickly in their hands. Once you finish one, it is easy to imagine making more in different colors for yourself, gifts, or everyday use around the house.
Why You’ll Love This Project
This crochet net bag is the kind of project that feels satisfying from the very beginning. It grows quickly, uses simple stitches, and turns into something you can actually use right away. The mesh texture keeps it light and flexible, and the finished bag has that easy handmade charm that works well for everyday errands, produce shopping, or a relaxed summer carryall.
Materials Needed
- Yarn
- Crochet hook
- Scissors
- Yarn needle
- Stitch markers if helpful
- Measuring tape
Use a yarn and hook size that matches your desired fit and texture.
Best Yarn for This Project:
A cotton yarn or cotton blend is usually one of the best choices for a net bag because it feels sturdy, breathable, and practical for everyday use. If you want a lighter drape, you can also try a softer plant-based yarn. For a stretchier casual tote, some crocheters also like acrylic, but cotton tends to hold shape better for shopping and carrying small items.
Skill Level:
Beginner-friendly to easy.
This project mainly suits crocheters who are comfortable with basic stitches and simple repetition. The mesh pattern is easy to remember, so it is a lovely confidence-building project for beginners who want to move beyond flat practice swatches.
Size and Fit Guide:
You can easily adjust the size of this bag while you work. Make the base wider or narrower depending on how large you want the finished tote to be, then continue the mesh body until you reach your preferred height. The straps can also be made shorter for a hand-held bag or longer for a shoulder bag. It helps to pause now and then, hold the bag up, and check whether the shape and depth look right for the way you plan to use it.
Stitches Used:
- Chain
- Slip stitch
- Double crochet
- Mesh-style spaces made with chain stitches
- Joining in the round
How to Make It

Step 1: Start the Foundation
This bag begins from the base, which gives it a nice practical shape before the open net section starts to grow upward. The tutorial shows a simple beginning that creates the foundation for the bottom of the bag. You work the first section carefully so the shape stays neat and balanced. This part matters because it gives the bag structure and helps the mesh body sit properly once it stretches with use.
Take your time here and make sure the starting section is not too tight. A tight beginning can make the bottom curl or pull inward, while a relaxed and even foundation helps the rest of the bag form more naturally.
Step 2: Build the Base
Once the foundation is made, the bottom of the bag is worked to create a stable area before moving into the airy mesh design. In the video, the base is built up in a simple way that keeps the project approachable while still making the bag useful. You do not need anything overly decorative here. A clean and sturdy bottom is enough to support the rest of the piece.
As you crochet this section, keep checking that your work lies flat. If the base starts pulling or waving too much, your tension may need a small adjustment. This early step sets up the whole bag, so it is worth getting comfortable before moving on.
Step 3: Create the Mesh Body
After the base is finished, the project starts to look like a true net bag. The body is made with an open mesh pattern that uses basic stitches and chain spaces to create that stretchy see-through texture. This section is the most enjoyable part for many crocheters because the pattern repeats easily and the bag grows quickly.
The mesh design gives the bag flexibility, which is exactly why this style works so well for shopping and carrying lightweight items. It may look small at first, but net bags usually expand nicely once used. Keep your stitches even and try not to pull the chain spaces too tightly, since the beauty of this style comes from that open and airy structure.
Step 4: Continue Until the Bag Reaches Your Preferred Height
The middle section is very adjustable, which makes this project nice for personalizing. If you want a compact produce bag or a smaller market tote, stop earlier. If you want a deeper everyday bag, continue working the mesh repeat until it feels right for your needs.
This is a good stage to hold the bag up and imagine what you want to carry in it. A shorter version feels light and casual, while a taller one can hold more and look more like a roomy tote. Because exact sizing can vary with yarn and tension, it is best to judge by the actual piece in your hands.
Step 5: Shape and Add the Handles
When the body is tall enough, the handles are formed at the top. This is where the bag starts to look finished and truly functional. The top edge is worked in a way that transitions from the mesh section into handle openings, then the handles are built up and secured so they feel comfortable to hold.
Make sure both sides match evenly. If one handle sits slightly higher or feels tighter than the other, the finished bag may twist when carried. Stitch markers can help you keep the handle placement balanced. You can also adjust the length here depending on whether you want the bag to sit in your hand, on your wrist, or over your shoulder.
Step 6: Finish the Top Edge
After the handles are in place, the top of the bag is finished neatly so everything looks clean and secure. This step helps strengthen the handle area, which is useful because that part of the bag gets the most strain during use. A tidy edge also gives the whole project a more polished handmade look.
If the top edge feels too soft, you can work with a slightly firmer tension here without making it stiff. The goal is to keep the bag flexible while still giving the opening a nice finished shape.
Step 7: Weave in Ends and Check the Shape
Once the crochet is complete, weave in all loose ends carefully. Because a net bag stretches, any unfinished ends can work their way loose over time, so this is not a step to rush through. After that, gently shape the bag with your hands and check that the base, sides, and handles all look even.
The finished bag should feel light, open, and stretchy, with a practical base and a roomy mesh body. It should have that easy everyday look that works for groceries, produce, beach items, or simple daily carrying.
Helpful Tips
- Cotton yarn is a great choice if you want the bag to feel practical and sturdy.
- Keep your tension even so the mesh looks balanced all the way around.
- Check the height before making the handles so the bag suits your needs.
- Use stitch markers to keep handle placement even.
- Make sure the top edge feels secure, since that area takes the most wear.
- If the bag looks small at first, remember that mesh usually stretches with use.
Common Mistakes to Avoid
- Making the foundation too tight
- Letting the base twist before joining
- Pulling the mesh stitches too tightly so the bag loses its open look
- Making one handle longer or tighter than the other
- Stopping too early before the body reaches a useful height
- Forgetting to weave in ends securely
Customization Ideas
You can easily make this bag your own. Try a neutral shade for a classic market look, or use bright summer colors for something cheerful and playful. You can make the body longer for a roomy tote or keep it shorter for fruit and produce. A wider base can give you more carrying space, while a smaller version makes a cute lightweight project bag. You can also add a simple edging at the top if you want a slightly more finished decorative look.
Style Ideas
This bag works beautifully as an everyday shopping tote, a farmers market bag, a casual beach carryall, or even a lightweight yarn project bag. It also makes a thoughtful handmade gift, especially for someone who loves practical eco-friendly accessories. Pair it with simple outfits, summer dresses, denim, or relaxed casual wear for that easy handmade touch.
Care Instructions
Hand washing is the safest option for most crochet bags, especially if you want to keep the shape looking nice. Use cool or lukewarm water and a gentle soap, then press out extra water without twisting too hard. Lay the bag flat to dry and avoid high heat, which can affect the yarn and shape.
Time Needed
This may take a few hours depending on your speed, yarn, size, and stitch pattern.
Conclusion
A crochet net bag is such a lovely mix of simple stitching and everyday usefulness. It is light, practical, and easy to customize, which makes it a rewarding project for both newer and more experienced crocheters. You can keep it classic, make it colorful, change the size, or adjust the handles to suit your own style. Once you make one, it is easy to see why this kind of bag becomes a favorite.
FAQs
Is this project beginner-friendly?
Yes, it is a good project for beginners who know basic crochet stitches and want an easy repeating pattern.
What yarn works best for a crochet net bag?
Cotton or a cotton blend is usually a great choice because it feels sturdy and practical.
Can I change the size?
Yes, you can adjust the base, body height, and handle length to make the bag suit your needs.
Will the bag stretch?
Yes, net bags usually stretch when used, which helps them hold more than they first appear to.
Can I use this bag for summer outings?
Absolutely. The open mesh design keeps it light and breathable, which makes it a nice choice for warmer weathe.