

Granny square crochet shorts are such a fun way to make a classic crochet motif wearable, colourful and full of personality. If you love granny squares but want something more exciting than a blanket or bag, this project is for you. The finished shorts have that fun handmade look with square motifs joined together to make the body, a comfortable waistband and a relaxed fit that you can adjust as you go. They’re perfect for summer outfits, beach days, festivals, lounging around, or layering over swimwear. This project will also be fun for confident beginners, especially if you already know some basic stitches and are comfortable joining pieces together. And the best part is you can make the shorts in your favourite colours, so every pair feels totally you.
Why You’ll Love This Project: 1.
This project marries the simple pleasure of granny square making with wearable crochet. You make the shorts from smaller squares instead of working on one big piece from start to finish, which makes the process feel relaxed and manageable. The shape is customisable, the colours are fun to experiment with and the finished shorts have a bold, handmade charm that looks adorable with summer tops, swimwear or casual outfits.
Supplies:
Yarn in colours of your choice
Crochet hook to match your yarn
Shears
Yarn needle for joining and weaving in ends
Markers for stitch
Measuring tape
Additional yarn to match waistband or tie
Choose a yarn and hook size that will give you the fit and texture you desire.
Suggested Yarn for This Project:
Best yarn for crochet granny square shorts is soft but strong. Shorts are wearable and can be worn in warm weather so cotton yarn, cotton blend, bamboo blend or some other breathable lightweight yarn is a good choice. The cotton gives the shorts structure and helps keep the stitches looking neat, while a lighter yarn stops the fabric from feeling too heavy. Acrylic can also work if you want a softer lounge type pair but try to avoid anything too bulky unless you want thick cosy shorts and not summer shorts.
Difficulty level:
This is a project for confident beginners or easy level crocheters. You need to be comfortable making granny squares, working basic crochet stitches, joining pieces and checking fit as you go. The build is not too hard, but the joining and shaping does require a little patience.
Size & Fit Guide:
You can change the size by adding more granny squares, or bigger squares, or the way you join the squares around the hips and legs. Before joining the pieces, measure around your waist, hips and upper thigh. Lay the squares flat and check the width before you sew or crochet them together. For wearable projects like this, it’s always better to test the fit while working, instead of waiting until the end. To make the shorts wider, add more squares or make the squares bigger. To make the shorts shorter or longer, change how many rows of squares you use.
Stitches Used:
Chain
Slip stitch
Double crochet
Groups of grannies
Chain spaces
Joining the seams
Basic Edging
Drawstring or waistband stitches
How to:
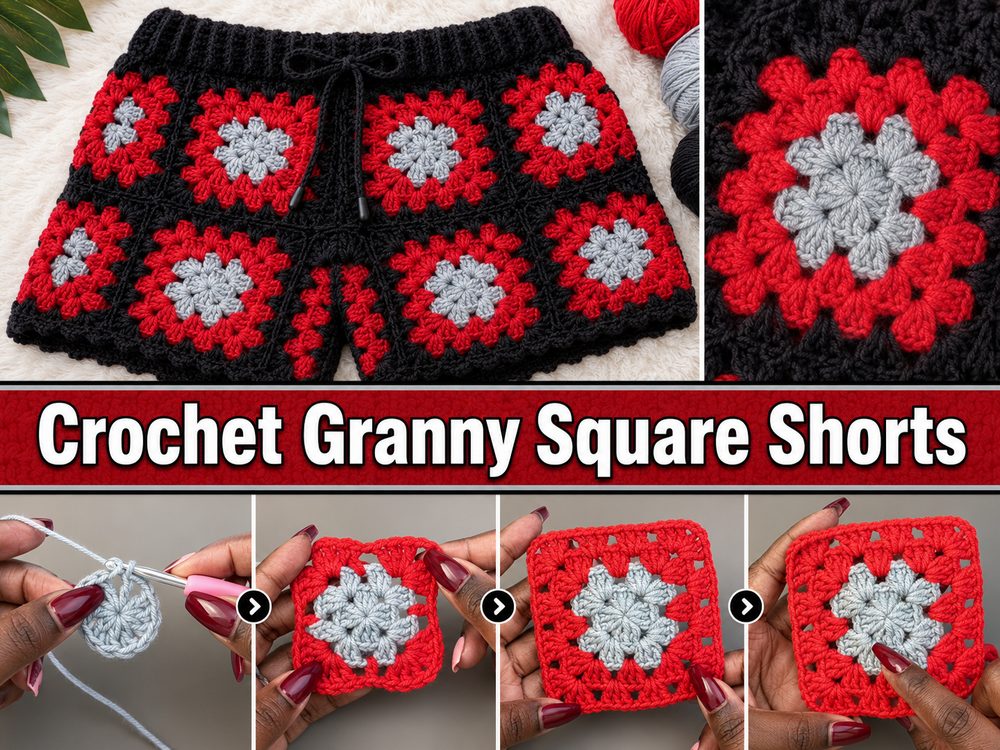
Step 1: Make the Granny Squares
The shorts start with making individual granny squares. These squares are the basis of the project so keep them all the same size. A traditional granny square is worked in rounds from the center out, with groups of double crochet stitches separated by chain spaces. Each corner is created with an extra chain space to keep the square in shape.
Decide on your colours before you start. You can make each square the same, use a different colour for each round or make a mixed patchwork look. It is useful to use the same final round colour on each square to get a neat pair of shorts, as this makes the join look neater.
As you complete each square, place it down and compare it to the others. If one square is much tighter or looser it could affect the final fit. But try to keep your tension steady so that all the pieces line up nicely when it is time to join.
Step 2: Make enough squares for the shape of the shorts
The body of the shorts is constructed by joining granny squares into panels. The tutorial style uses the squares as the building blocks so the number of squares is dependent on your body size, yarn weight, hook size and how loose or fitted you want the shorts to be.
Lay the squares on a flat surface and arrange them in the shape of shorts before joining. You will need enough width to go around the hips and enough length to cover the body from waist to hem. Since shorts have two leg holes, the pattern must fit around each leg and the center seam. Imagine building two connected panels that wrap around the body
This is where measurement counts. Wear the squares around your hips or compare them with a pair of shorts that already fit you. The squares shouldn’t be pulled tight. The shorts are comfortable to sit in, walk in, or pull on, as crochet fabric does need a little ease.
Step 3: Link the squares
Once the layout looks good start joining the granny squares together. You can join using slip stitches or single crochet or sew with a yarn needle. A crochet join will have a bit of a bump to it and sewing can look more flat and soft. Use whichever method achieves the finish you like best.
Join the squares together carefully at the edges, corner to corner, side to side. If necessary, use stitch markers when sewing longer sections together. This helps keep the pieces from shifting and keeps the seams neat.
Check the shape again after joining the front and back sections. The shorts should start to look like a wearable item, the granny square pattern visible on the front, back and legs. No need to hurry here. A neat join makes a world of difference to the professionalism of the finished shorts.
Step 4: Cut the Crotch and Leg Openings
Shaping is the most important part of crochet shorts. Granny squares are flat motifs and need to be joined in such a way that they allow movement in the hips, crotch and legs. The center should be connected securely but not pulled too tight. If the crotch seam is too short, the shorts may ride up If it’s too loose it can look baggy.
Try the piece on easily or hold it against your body as you work. Make sure leg openings are symmetrical. If one side feels tighter, adjust before closing it off. Granny square shorts – Comfort can be improved with small changes in joining.
If you want a looser, beachy fit, leave more ease around the leg openings. For a better fit make the squares join tighter but leave enough room for movement.
Step 5: Sew the Waistband.
Once you’ve attached the main granny square body, the top edge needs a waistband. The waistband helps keep the shorts in place and makes them look more finished. You can crochet rounds around the top edge, make a simple band or add a drawstring, depending on your choice.
Work evenly all round the waist, putting stitches into the tops of the granny squares and chain spaces. If the opening is too wide, you can work fewer stitches or add a drawstring to narrow the opening. A drawstring is especially useful as it allows the shorts to remain adjustable.
For a soft waistband keep your tension loose. If the waist band is tight you may feel uncomfortable. If they’re too loose the shorts may ride up. It is designed to fit securely but flexibly.
Step 6: Complete the Leg Edges
You can neaten the edges of the leg openings with one round of stitches. A simple single crochet or slip stitch border is a nice choice if you want the granny squares to shine. If you want a more playful finish you can also add a decorative border.
Both leg openings should be finished the same way. Count them or compare the rounds side by side so the shorts appear balanced. If you’re making shorts for summer, don’t put a heavy border around the legs. The shorts are kept comfortable and breathable with a light edge.
Step 7: Weave in the ends and try it on
Granny squares are usually multi-colored so chances are you will have a lot of ends to weave in. Be patient with this step. Wearable crochet has more movement than decorative crochet so be sure to secure the ends well, especially near seams and the waistband.
Weave in the ends and try on the shorts, check the fit at the waist, hips, crotch and the legs. The finished shorts should be comfortable, flexible and allow easy movement. The granny squares should line up nicely and the waistband will help keep everything in place.
Helpful Advice:
Choose a breathable cotton or cotton-blend yarn for summer shorts. Dry fit each seam before permanently joining. Make your granny squares all the same size so the panels line up nicely. Use stitch markers to hold squares in place before joining. Lay the garment flat often to balance both sides of the shorts. If squares are curling or uneven, block before joining. Securely weave in the ends so the shorts hold up when worn.
Common Errors to Avoid:
Making squares in different sizes can cause uneven seams.
Joining the shorts before checking hip and waist measurements.
Sewing the crotch seam too tight or too short
Not leaving enough room to move around
Using too heavy of yarn for shorts in warm weather
Rushing the finish-off and not tying off the yarn ends
Customising Ideas:
These shorts can be bright and colourful with a different shade for each square, or soft and simple in neutrals. Add a scalloped edge to the legs for a cute homemade touch or leave the edges plain for a cleaner look. The drawstring can be in a coordinating or contrasting colour. You can also play with the length by making more granny squares, make it looser fitting for beachwear or go for smaller squares for a more detailed patchwork style.
Style Ideas:
These crochet granny squares shorts look great with a plain tank top, cropped tee, bikini top or oversized summer shirt. They make awesome beach coverup shorts, festival shorts and comfy handmade lounge shorts. You could use the same granny square colours for a matching crochet top, bag or headscarf. They also make a lovely hand made gift for the person who likes bold crochet fashion.
Care Instructions:
To hand wash shorts in cool water with mild soap, rinse thoroughly and hang to dry. Do not wring or pull the fabric when wet. Remove excess water with a towel and drape shorts flat to dry. Heat can warp the yarn and shape, so avoid high heat. If the shorts stretch out a little after washing, reshape whilst damp and dry flat.
Time Required:
Depending on your speed, yarn, size and stitch pattern this will take a few hours. The granny squares themselves are simple to make but the joining, shaping and weaving in of ends can take extra time
Conclusion:
Crochet granny square shorts are a cheerful and creative project for anyone who enjoys wearable crochet. They let you play with color, practice joining motifs, and make something that feels both vintage and stylish. The best part is how adjustable they are. You can change the size, length, colors, waistband, and leg finish until the shorts suit your body and your personal style. Take your time with the fit, keep the seams neat, and enjoy turning simple granny squares into a fun handmade piece.
FAQs:
Is this beginner-friendly?
Yes, it can be beginner-friendly if you already know how to make a granny square and join crochet pieces. Confident beginners should be able to follow along with patience.
What yarn is best for crochet granny square shorts?
Lightweight cotton or cotton-blend yarn is best for summer shorts because it is breathable and gives the fabric nice structure.
Can I adjust the size?
Yes. Adjust the size by changing the number of squares, the size of each square, or the way the pieces are joined around the waist, hips, and legs.
Can I make these shorts longer?
Yes. Add more granny squares or extra rows around the leg openings if you want a longer shorts style.
How do I make the waist fit better?
Add a crocheted waistband or drawstring so the waist can be tightened comfortably.
Can I sell the finished shorts?
You can usually sell finished handmade items you make yourself, but avoid copying someone’s exact written pattern or branding.
How do I keep them comfortable for summer?
Use breathable yarn, avoid very tight seams, and keep the edging light so the shorts do not feel heavy.