
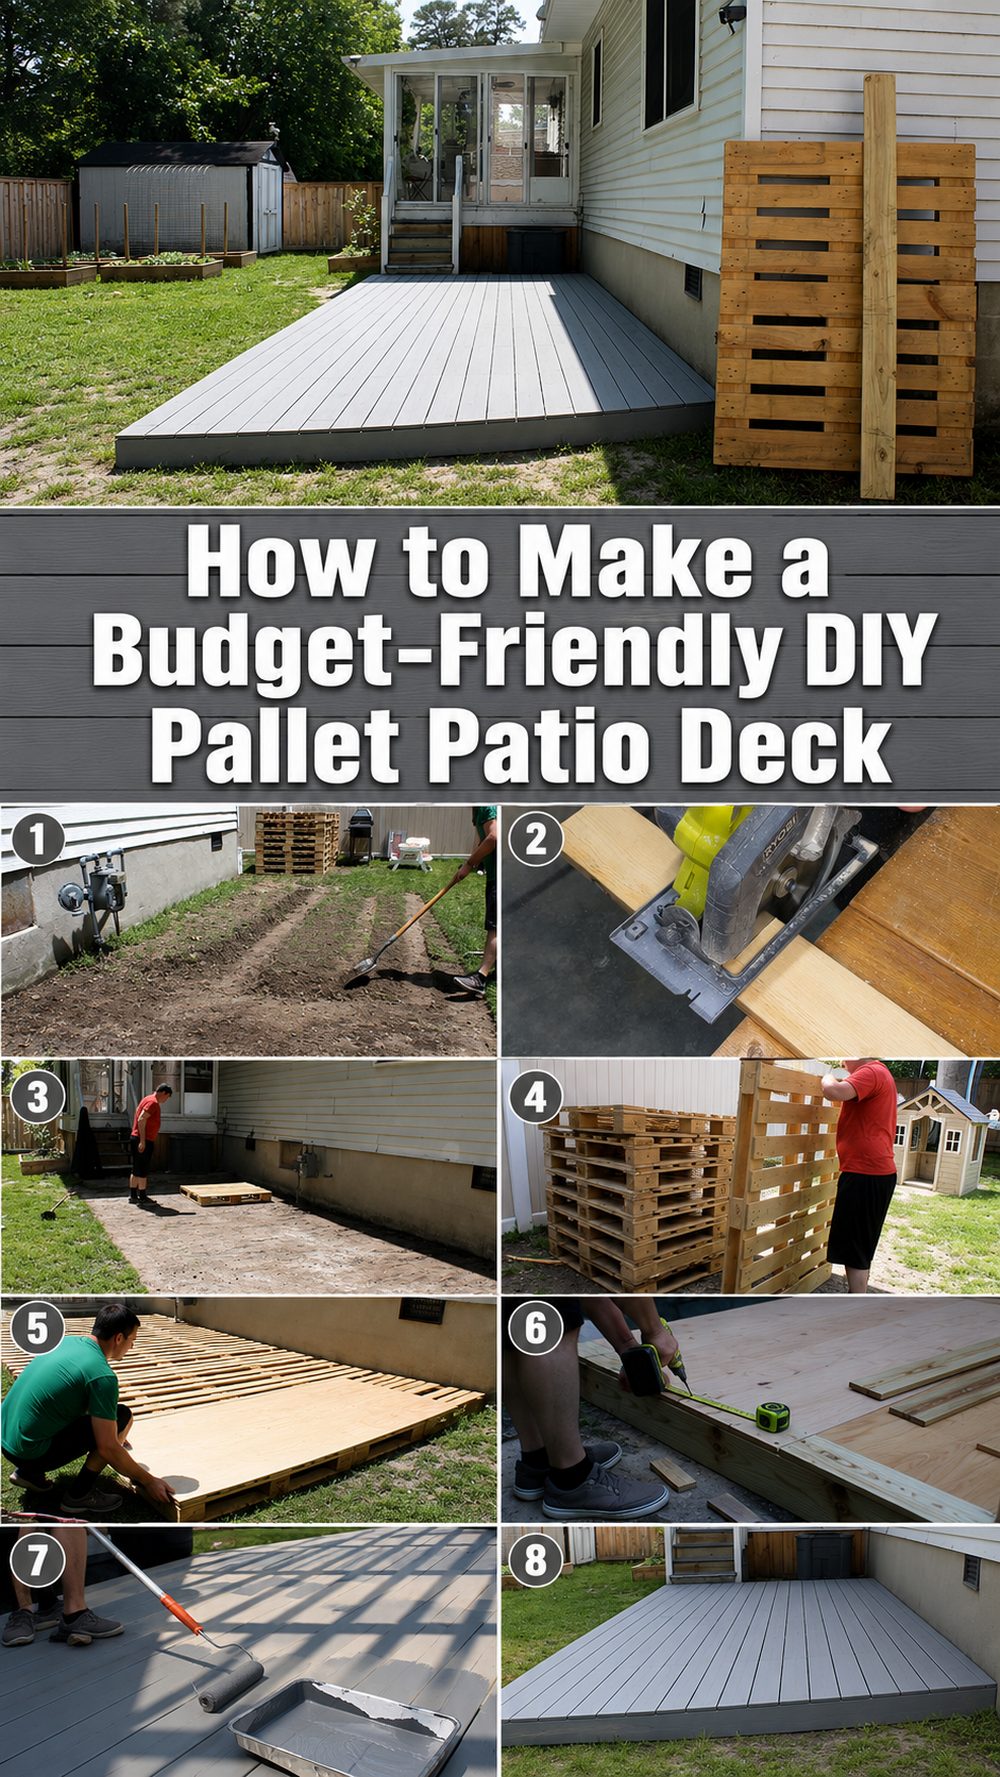
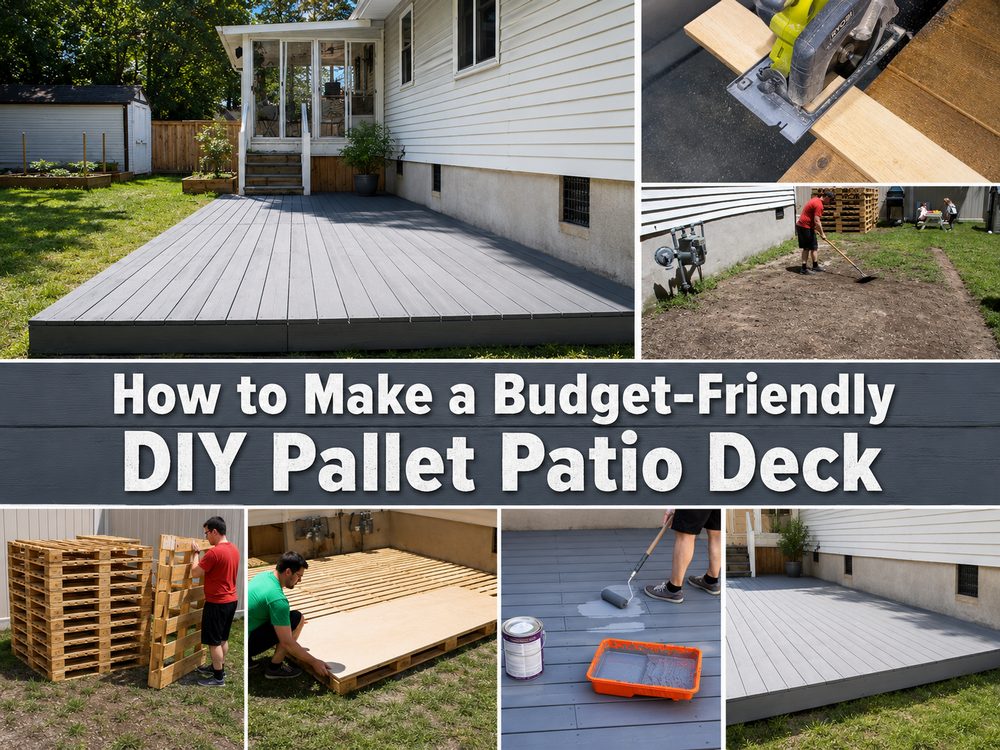
A pallet patio deck is a smart way to turn a plain patch of yard into a more inviting outdoor spot without going for a full A pallet patio deck is a great way to turn a boring patch of yard into a more inviting outdoor space without building a full traditional deck. The tutorial I chose had a simple platform style design using pallets for the base and the fence pickets across the top. It gives the finished space a cleaner, more finished look than raw pallets alone. This is the kind of project that lends itself to casual seating areas, small grilling nooks, garden lounging spaces or a simple backyard refresher. If you love simple outdoor DIY projects that look great without feeling overly complicated, then this one has a lot to love. It is especially appealing for anyone who wants a low deck look on a limited budget and loves the charm of recycled wood.
Why You’ll Love This Project:
This project offers you the look of a small backyard deck in a more affordable and accessible way. The pallet base creates the platform and the top boards make it look more finished and comfortable for everyday use.
Materials Required:
Wood pallets for the base.
Boards for top surface (fence pickets or similar)
Strong fasteners (screws etc.) for outdoor use
Base prep material or ground cover if needed
Optional edging or trim pieces for a cleaner finish
Pick out similar materials that suit the look, size and style you want.
Required Tools:
Driver Drill
Saw for trimming boards if necessary
Tape measure
Stage
Basic marking equipment.
Safety equipment
Most of the work should be done with basic household or DIY tools.
Best Materials for This Project:
The best choice for an outdoor pallet patio deck is solid, dry, and sturdy wood. The base pallets should be in good shape and as flat as possible. Pallets are good for the top, especially fence pickets or similar deck-covering boards, as they hide the pallet look and make for a flatter walking surface. Screws rated for outdoor use are better than flimsy nails or fasteners designed for indoor use. A finish that is friendly to weather can help the wood last longer.
Skill Level:
Beginner to confident. It’s a simple build style, but you need to measure carefully, keep the base level and secure everything tightly for safe outdoor use.
Size and Placement Chart:
You can keep this deck small for a couple of chairs or make it larger for a seating zone or dining nook. Shape can be customised to suit your yard, patio edge or garden corner. Pick a site that has relatively level ground, and good enough drainage that water doesn’t pool under the deck. Natural wood fits well in rustic settings, while painted or stained options can enhance modern patios, charming cottage gardens or neutral backyard schemes.
How to prepare it:
Step 1: Base preparation
Start by clearing the area where the deck will be. Clean up loose debris, check the ground level, and make any basic adjustments needed so the platform can be more evenly supported. A clean, stable base will make the whole project look and feel better.
Step 2: Organise the Pallets
Put the pallets in the layout you want for the deck. Now is the time to test the shape, the spacing, the overall footprint. Make sure the arrangement looks balanced and fits the space well before you secure anything for good.
Step 3: Make the Platform Shape
Once you have the pallet layout you want, screw the sections together so they act more like one solid platform. While you are working, keep checking the surface and making little adjustments if one area is higher or lower than the rest. The goal is a non-moving, stable deck base.
Step 4: Add the Top Boards
When the pallet frame is built, start to cover the top with fence pickets or similar boards. Lay these across the base of the pallet to give a neater finished surface. Keep spacing even and cut off edges as needed to neaten them. This top layer is what gives the project that patio deck feel rather than exposed pallets.
Step 5: Add Texture or Colour
At this point you can leave the wood bare for a simple rustic look or stain, paint or seal it for protection. Select a finish that is appropriate for your garden and will stand up to the outdoors.
Step 6: Top with
When the structure is built, dress it up with outdoor chairs, planters, lanterns, a small rug or table. Even a very simple arrangement can make the space look finished and inviting.
Step 7: Completion and Styling
Step back and look over the entire deck for loose boards, rough edges or areas that need additional fastening. Then position furniture and decor to keep the space comfortable and accessible.
Useful Tips:
Measure your space before you place the pallets
Lay the pieces out and test fit before fastening them together.
Grab pallets that feel solid and pretty even
To get a cleaner look, line up the top boards
Let paint, stain or sealer dry completely before styling
If the deck is going to remain outdoors, use materials that will withstand outdoor exposure.
Common Mistakes to Avoid:
Beginning on uneven ground
On pallets that are broken or weak
No ‘Layout check prior to fastening’.
This leaves big uneven gaps in the top boards.
Indoor screws or finishes used outside.
Putting furniture in before the surface is completely done
Ideas for Customisation:
You can stain the deck dark for a richer patio look, whitewash it for a softer cottage style, or paint it to coordinate with your outdoor decor. If you have the space, build in planters along the edges, hang string lights nearby, add a bench or simple railing details. You could also do square instead of rectangular or extend one side out for more of a lounge style setup.
Style Suggestions:
This kind of deck fits nicely under a couple of outdoor chairs, a small conversation set or a small dining table. It also works well adjacent to raised beds, under a pergola, near a fire pit area or as a simple platform for container plants and decor.
Care Instructions:
Wipe the surface down as needed and on a regular basis. Check screws and boards regularly, particularly after wet weather. If you paint or seal it, touch up the finish when it wears. Look for moisture around the base to keep the wood in better shape.
Time Required:
This project may take a short afternoon or a few hours depending on your materials, size, ground prep, drying time and level of detail.
Budget Guide:
If you have pallets or leftover boards already, this can be a pretty cheap project. Use of reclaimed or easy to find materials can help keep costs lower and provide a good looking outdoor upgrade. The tutorial we chose shows how to make a budget-friendly platform deck out of pallets and fence pickets.
Conclusion:
If you want an outdoor project that feels useful, attractive, and doable, a pallet patio deck is a great idea to try. It has a practical structure, a more finished top surface, and plenty of room for your own style. Keep the build simple, make it fit your yard, and finish it in a way that feels right for your home.
FAQs:
Is this beginner-friendly?
Yes, it is a good project for a beginner who is comfortable measuring, fastening boards, and checking level as they work.
What materials are best?
Strong pallets for the base and straight outdoor-friendly boards for the top usually give the best result.
Can I make it bigger or smaller?
Yes. You can adjust the pallet layout and top boards to suit your available space.
Can I use recycled materials?
Yes, as long as they are clean, sturdy, and suitable for outdoor use.
Can I use it outdoors all year?
You can, but it will last better with proper placement, drainage, and weather protection.