8 Paper Bag Puppets

Paper bag puppets are one of those crafts that feel easy, affordable, and endlessly fun. With just a few simple supplies, kids can turn plain lunch bags into playful animals and characters for storytelling, pretend play, or classroom activities. This collection includes a nice mix of silly, sweet, and themed puppet ideas, so you can pick something for any season or interest. From sharks and zebras to unicorns and monsters, these crafts are beginner-friendly and great for using up paper scraps, paint, and googly eyes. They are especially handy for rainy days, preschool art time, or simple weekend crafting at home.
Paper Bag Monster Puppet

This monster puppet is perfect when you want something playful instead of spooky. Kids can mix bright colors, big eyes, funny teeth, and silly antennae, so every puppet turns out different and full of personality.
Materials:
Paper bag, craft paint, cardstock, googly eyes, glue, scissors
Steps:
- Paint the bag and let it dry.
- Cut out monster teeth, horns, or antennae.
- Glue the face pieces onto the flap.
- Add eyes and extra details.
- Let dry and use as a puppet.
Tutorial Link: Glued To My Crafts – Paper Bag Monster Puppet Craft.
Paper Bag Shark Puppet

A shark puppet is a fun pick for ocean units or Shark Week. This version has a cute, kid-friendly look, with painted bag colors, a wide red mouth, white teeth, and simple fin shapes.
Materials:
Paper bag, paint, cardstock, googly eyes, glue, scissors
Steps:
- Paint the top darker and the lower bag lighter.
- Cut out fins, mouth, and teeth.
- Glue the mouth under the flap.
- Add teeth and eyes.
- Attach the fins to the sides and top.
Tutorial Link: Our Kid Things – Paper Bag Shark Craft.
Paper Bag Zebra Puppet

This zebra puppet keeps things simple but still looks striking. The black stripes pop against the white bag, and the craft works well for animal lessons, safari themes, or easy afternoon crafting.
Materials:
White paper bag, black and white cardstock, wiggle eyes, glue, scissors
Steps:
- Cut ears, a nose, stripes, and a little mane.
- Place the face pieces on the flap.
- Glue stripes around the body.
- Add eyes and any extra details.
- Let dry before playtime.
Tutorial Link: Glued To My Crafts – Paper Bag Zebra Puppet Craft.
Paper Bag Unicorn Puppet

This unicorn puppet feels cheerful and magical without being hard to make. The yarn mane adds texture, while the pink snout, white ears, and gold horn make it bright and instantly recognizable.
Materials:
Paper bag, white and pink paper, yarn, gold paper, glue, scissors
Steps:
- Cover or use a light-colored bag.
- Cut out ears, snout, and horn.
- Glue the face onto the flap.
- Attach yarn strands for the mane.
- Draw a smile and add details.
Tutorial Link: Glued To My Crafts – Paper Bag Unicorn Puppet Craft.
Halloween Owl Paper Bag Puppet

This owl puppet is a fun seasonal twist for fall crafting. The large round eyes, purple body, and sparkly wings make it colorful enough for display but still easy for kids to assemble.
Materials:
White paper bag, craft paint, cardstock, printable owl pieces, glue, scissors
Steps:
- Paint the bag purple and dry it.
- Cut out big eyes, wings, and beak.
- Glue the face on the flap.
- Add wings and decorative touches.
- Let dry and use for pretend play.
Tutorial Link: Glued To My Crafts – Paper Bag Halloween Owl Puppet.
Paper Bag Penguin Puppet
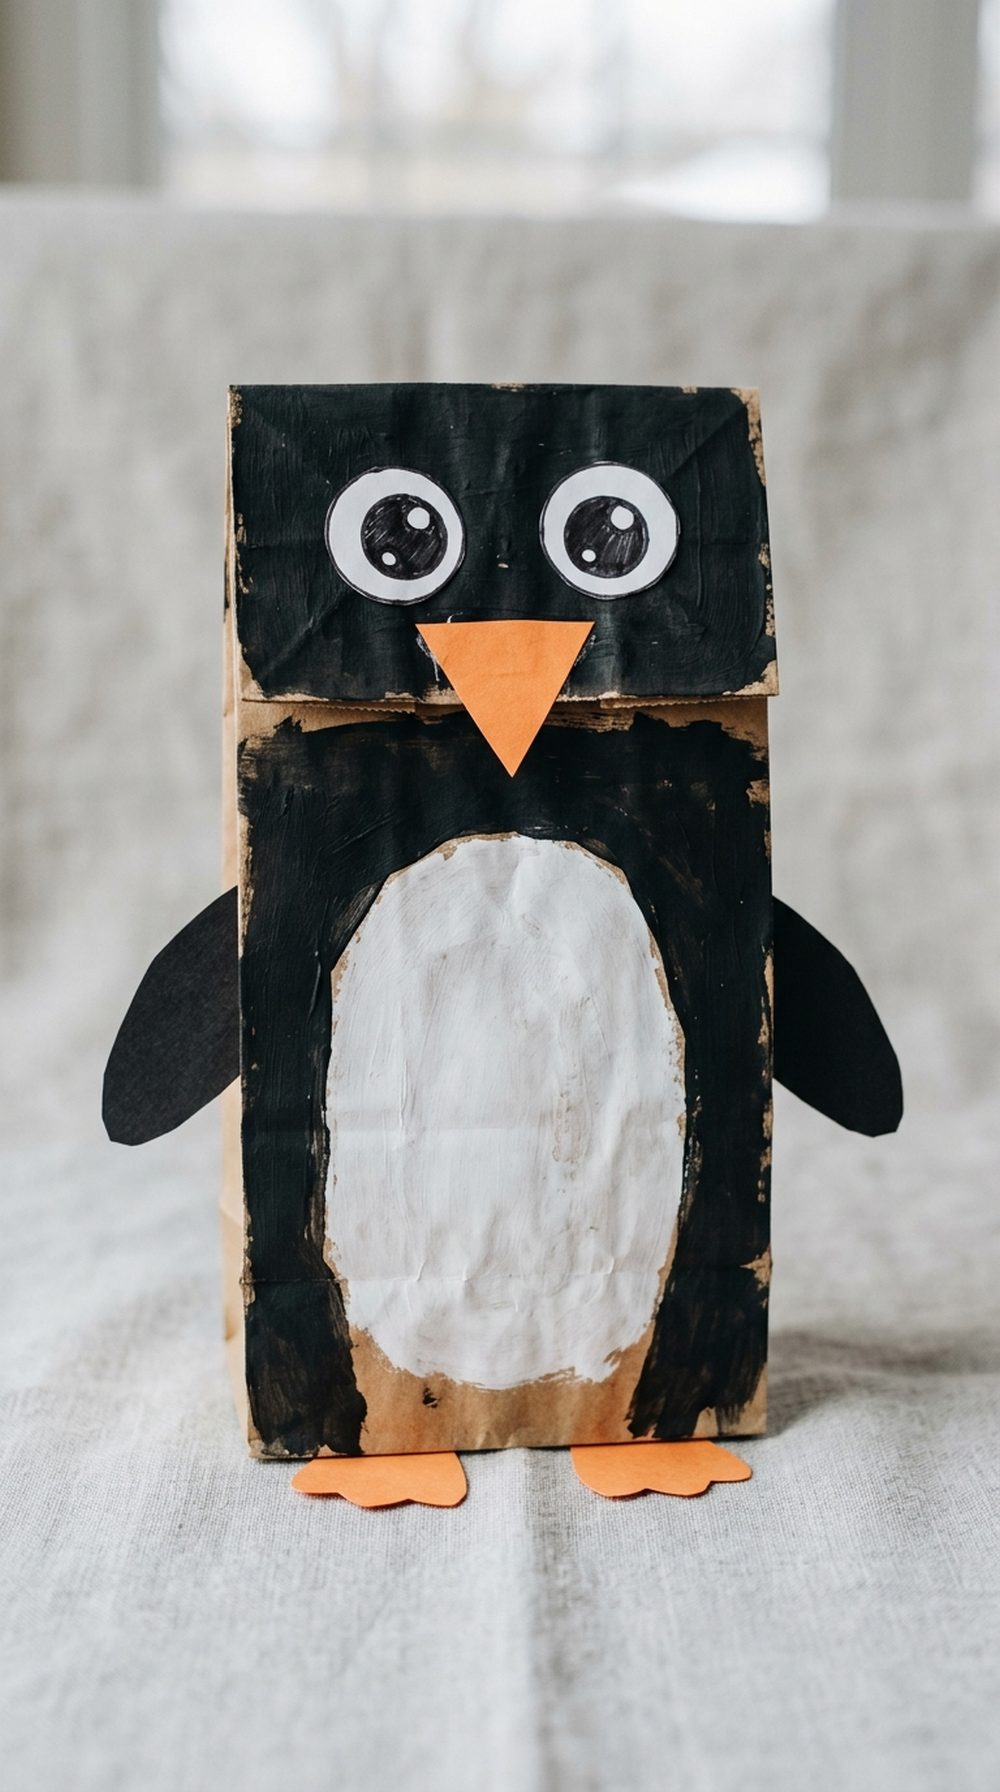
A penguin puppet is a sweet winter craft that looks adorable with basic black-and-white pieces. It is especially good for younger kids because the body shape is simple and easy to decorate.
Materials:
Brown paper bag, black paint, white cardstock or doily, orange paper, glue, scissors
Steps:
- Paint the bag black where needed.
- Add a white belly shape.
- Cut out a beak and feet.
- Glue the face pieces onto the flap.
- Add eyes and let everything dry.
Tutorial Link: Glued To My Crafts – Handprint and Paper Bag Penguin Craft.
Paper Bag Sloth Puppet

This sloth puppet is ideal for a calm, cute animal craft. The soft brown tones and sleepy face make it charming, and kids can add textured details to give it a fuzzy, cozy look.
Materials:
Brown paper bag, brown paint or paper, sloth printable, glue, scissors
Steps:
- Use a brown bag as the base.
- Cut out the sloth face and body pieces.
- Glue the face on the flap.
- Add arms, claws, or fuzzy details.
- Let dry before using it as a puppet.
Tutorial Link: Glued To My Crafts – Sloth Paper Bag Puppet Craft.
Paper Bag Dalmatian Puppet

This Dalmatian puppet is great for kids who love dogs. The spotted look is fun to make, and fingerprint or painted dots give the finished puppet a playful handmade style.
Materials:
Paper bag, white paper or paint, black paint, googly eyes, glue, scissors
Steps:
- Cover the bag in white if needed.
- Add black spots with paint or fingerprints.
- Cut out floppy ears and a nose.
- Glue the face onto the flap.
- Finish with eyes and any collar detail.
Tutorial Link: Glued To My Crafts – Paper Bag Dalmatian Puppet Craft.
Conclusion
Paper bag puppets are such an easy way to turn basic supplies into something creative and interactive. You can keep them simple for younger kids or add extra textures and details for a more decorative finish. Try one idea or make a whole puppet set for storytelling and pretend play.
FAQs
What kind of paper bag works best?
Standard lunch-size paper bags work best for most puppet crafts.
Can toddlers make these puppets?
Yes, with adult help for cutting and gluing small pieces.
What can I use instead of googly eyes?
Cut paper circles or draw eyes with markers.
How do I make puppets last longer?
Use cardstock for details and let glue dry fully before play.