
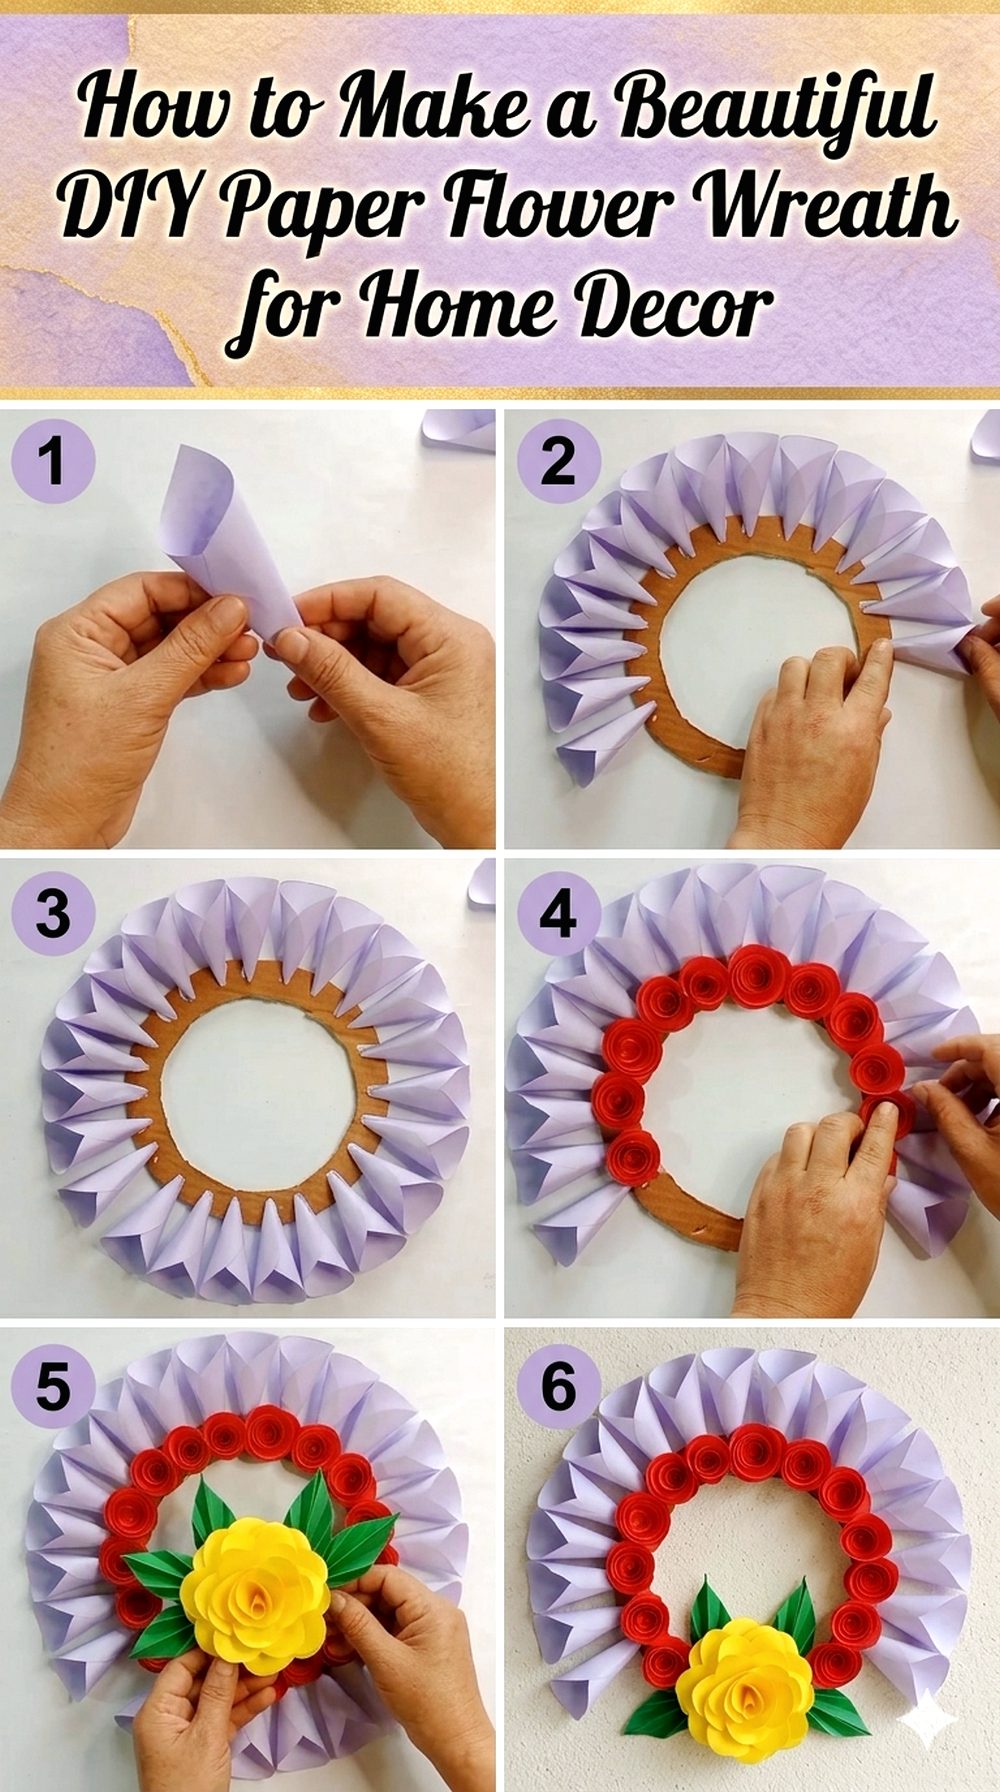
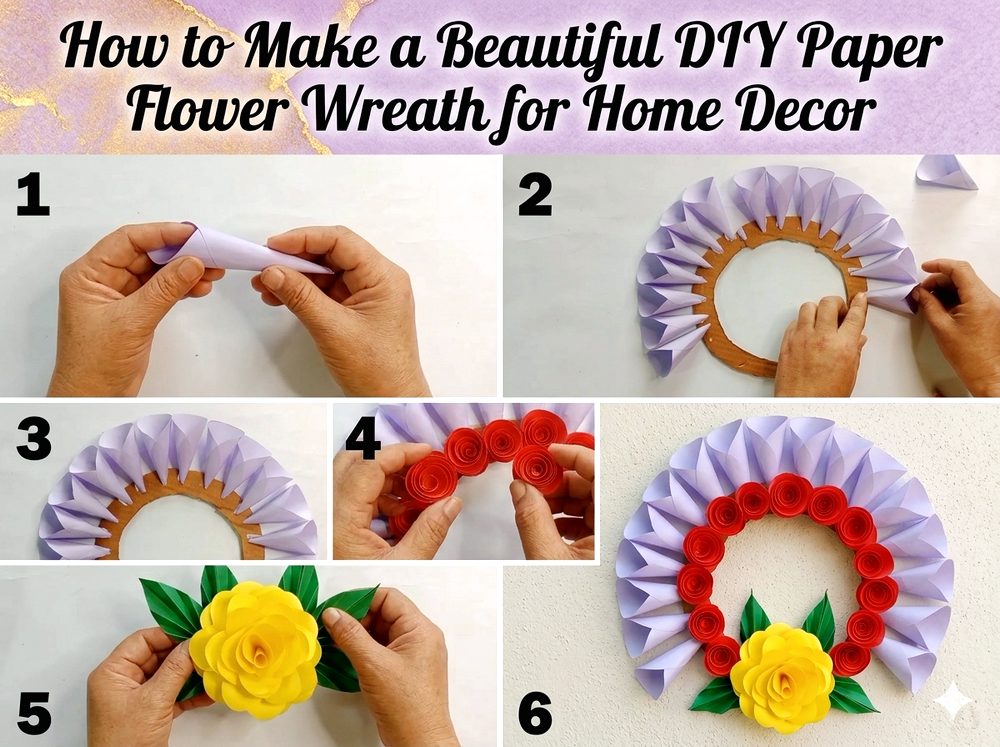
A handmade flower wreath is such a lovely way to add softness, color, and a personal touch to your home. This style of wreath works beautifully as wall decor in a bedroom, hallway, craft corner, or living room, and it has that cheerful handmade look that makes a space feel warm right away. The tutorial I selected shows a paper flower wreath wall hanging built around a circular design with layered petals and floral details, making it a great project for anyone who enjoys easy decorative crafts. It is especially nice for beginners because you can work at your own pace, adjust the colors to suit your room, and create something that feels both creative and polished without needing expensive supplies.
Why You’ll Love This Project:
This wreath is pretty, lightweight, budget-friendly, and easy to customize for different rooms and seasons. It gives you the charm of floral decor in a handmade version that feels creative and personal. The selected tutorial features a circular floral wall hanging with folded petals and smaller flower details, which makes the finished look eye-catching without seeming too complicated.
Materials Needed:
- Colored craft paper or similar decorative paper
- A round base or ring for the wreath shape
- Paper for flower centers or small accent flowers
- Glue or craft adhesive
- Decorative backing or hanging support if needed
Use similar materials that match the look, size, and style you want. The tutorial centers on a paper wall-hanging wreath with folded petal shapes and small floral accents.
Tools Needed:
- Scissors
- Pencil for tracing or marking
- Ruler if you want even pieces
- Glue gun or basic craft glue
- Basic household or craft tools are enough
Best Materials for This Project:
For a neat and attractive finish, medium-weight craft paper works really well because it is easier to shape than very thin paper and lighter than heavy card. If you want a more polished look, choose colors that complement your room decor, such as blush, lavender, cream, sage, white, or muted gold. For a bolder statement piece, use brighter flower tones with a contrasting base. A sturdy wreath ring or circular backing helps the design keep its shape once all the petals and flowers are attached.
Skill Level:
Beginner-friendly to easy intermediate. The shapes and assembly are simple, but patience helps when folding, arranging, and layering the petals neatly.
Size and Placement Guide:
You can make this wreath small for a gallery wall, medium for a bedroom or entryway, or larger for a feature wall. Choose colors that match your space, whether you want soft romantic decor, bright cheerful wall art, or a seasonal look. It can hang above a side table, near a mirror, in a reading corner, or as part of a handmade decor arrangement. If you are gifting it, adjust the size so it is easy to hang and store.
How to Make It:
Step 1: Prepare the Base
Start by getting your circular base ready. This can be a craft ring, a cut-out circle, or another lightweight wreath form that suits paper work. Make sure it is clean, smooth, and strong enough to hold the layered decorations. If you want a fuller look, think about how much of the base will show before you begin attaching anything.
Step 2: Arrange the Pieces
Cut or prepare the paper pieces for the main petal shapes. The tutorial shows a floral wreath look built from repeated folded petal forms, so it helps to make several matching pieces before assembling. Lay them out first so you can see how they will sit around the wreath. This makes it easier to balance the design before gluing.
Step 3: Build the Shape
Begin attaching the larger petal pieces around the circular form. Work gradually around the wreath so the spacing stays even. As the shape grows, step back now and then to check that the circle still looks balanced. Continue until the main floral ring feels full enough and the wreath shape is clearly defined.
Step 4: Add Color or Texture
Once the base layer is in place, start building visual interest with smaller flowers, layered petals, or contrasting paper details. The featured tutorial includes smaller rose-like accents within the design, which adds depth and makes the wreath feel more decorative. You can keep the colors soft and elegant or add stronger contrast for a more playful handmade style.
Step 5: Decorate
Now add the finishing flower details where the wreath needs a little extra fullness or color. This is a good stage to tuck in smaller accents, adjust the spacing, and make sure one side does not feel heavier than the other. Keep the overall look neat so the circular shape stays easy to see.
Step 6: Finish and Style
Let everything dry fully before hanging. Once the wreath is secure, add a hanger, ribbon, or hidden loop on the back if needed. Place it on a clean wall where the colors can stand out. This type of paper wreath looks especially pretty in soft natural light and works well as gentle everyday decor.
Helpful Tips:
- Measure and cut a few test pieces before making all your petals.
- Arrange everything loosely before gluing.
- Let glue dry properly between layers if the design feels delicate.
- Keep the wreath balanced by working around the circle instead of filling one side first.
- Choose colors that connect with your room so the piece feels intentional.
- Use a clean flat workspace to keep paper edges neat.
Common Mistakes to Avoid:
- Cutting all pieces freehand without checking size consistency
- Using too much glue and wrinkling the paper
- Adding decorations before the main shape looks balanced
- Mixing too many colors that compete with each other
- Hanging the wreath before the glue is fully dry
- Using very flimsy paper that bends too easily
Customization Ideas:
Try pastel shades for spring, deep jewel tones for a richer look, or white and beige for neutral decor. You can add tiny pearls, leaves, ribbon, paper butterflies, or seasonal accents. Recycled paper can also work if you want a budget-friendly version. For a more modern style, keep the design minimal with one main flower color and a simple base.
Style Ideas:
Display it as wall art, use it in a craft room, place it above a small console table, or include it in a gallery wall. It also makes a thoughtful handmade gift for birthdays, housewarmings, or festive decorating. You can style it alone for a clean look or pair it with framed prints and candles for a cozy decorative corner.
Care Instructions:
Dust gently with a soft dry cloth or a light handheld duster. Keep paper wreaths away from moisture, strong humidity, and direct splashes. Store seasonal versions flat or in a box to protect the petals. If needed, reshape any bent paper details gently by hand.
Time Needed:
This project may take a short afternoon or a few hours depending on your materials, size, drying time, and detail level.
Budget Guide:
This can be a very affordable project, especially if you already have paper, scissors, and glue at home. It also works well with leftover craft supplies.
Conclusion:
This DIY flower wreath is a lovely way to create home decor that feels handmade, cheerful, and personal. The circular floral design is easy to adapt to your own color palette and decorating style, so you can make it sweet and simple or full and dramatic. Take your time with the layout, enjoy the process, and make it in a way that feels right for your space.
FAQs:
1. Is this beginner-friendly?
Yes, it is a beginner-friendly paper craft as long as you work slowly and keep your pieces fairly even.
2. What materials are best?
Medium-weight craft paper and a sturdy circular base are usually the easiest to work with.
3. Can I make it bigger or smaller?
Yes, just adjust the size of the wreath base and the number of petals or flowers.
4. Can I use recycled materials?
Yes, clean leftover paper or lightweight packaging paper can be used if it still folds and holds shape well.
5. Can I use it outdoors?
Paper wreaths are better for indoor use unless you protect them carefully from weather and moisture.