

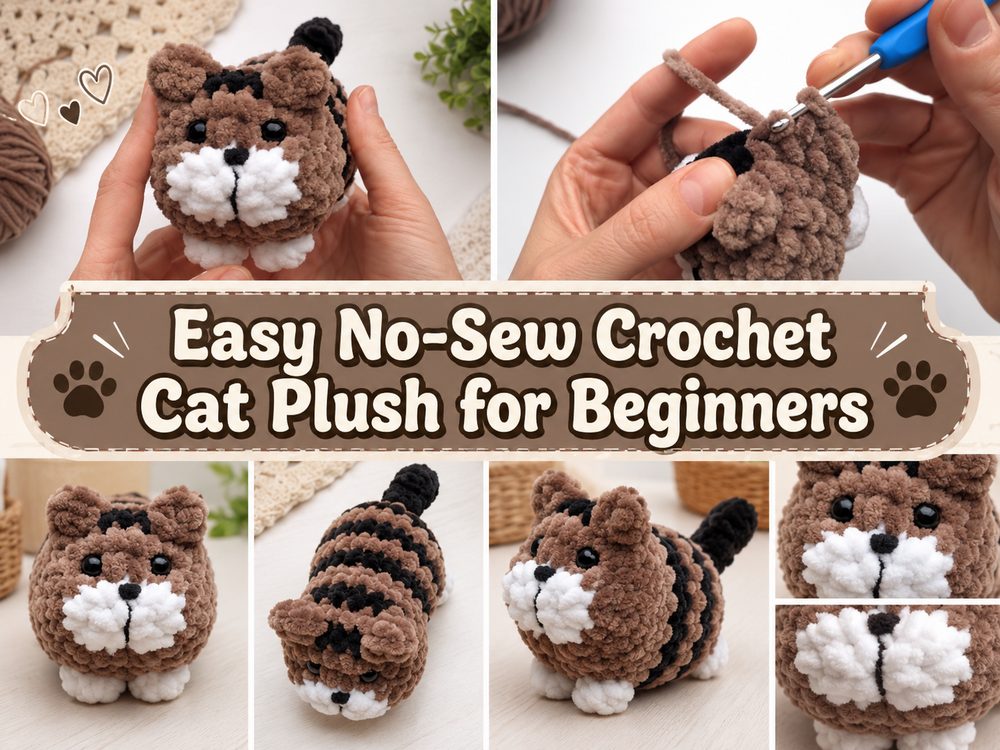
If you love small handmade toys and soft cuddly crochet projects, this crochet cat plush is such a sweet one to try. It has that round, squishy, huggable look that makes amigurumi so fun, but it still feels simple enough for beginners who want something cute without too much stress. The finished cat has a soft plush texture, tiny ears, and a simple little face that gives it plenty of personality. It is the kind of project that works well as a gift, a desk buddy, a shelf decoration, or a cozy little toy to keep for yourself. If you enjoy quick projects with a satisfying result, this cat is a lovely choice. It is especially nice when you want a soft plush finish and a pattern that keeps the sewing to a minimum.
Why You’ll Love This Project:
This crochet cat plush is one of those projects that feels cute from the very beginning. It works up into a soft little cat with lots of charm, and the no-sew style makes it even more enjoyable because you are not left attaching lots of tiny pieces at the end. It is fun, giftable, and perfect when you want a relaxing plush project.
Materials Needed:
- Plush chenille yarn in the main colors used for the cat
- A crochet hook
- Stuffing
- Stitch marker
- Scissors
- Yarn needle
- Safety eyes or black embroidery thread for the face
- A little extra yarn for facial details if needed
If exact yarn or hook size is unclear, use a yarn and hook size that matches your desired fit and texture.
Best Yarn for This Project:
A soft chenille or velvet-style yarn works especially well for this cat plush because it gives the finished piece that cuddly, squishy look. It also helps the toy feel extra soft in your hands. If you want a tiny cat, go with lighter yarn. If you want a bigger and fluffier plush, use a thicker plush yarn. Smooth chenille yarn in soft cat-like shades looks especially sweet for this pattern.
Skill Level:
This project is best for beginners or confident beginners.
It mainly uses simple amigurumi basics, but you do need to stay focused while working in the round and shaping the cat. The no-sew construction makes it easier and more enjoyable, especially if you do not love assembling lots of parts.
Size and Fit Guide:
Since this is a plush project, the size is easy to adjust by changing the yarn thickness and hook size. Thicker yarn makes a larger cat, while thinner yarn creates a smaller one. If you want a firmer plush, stuff it a little more. If you prefer a softer look, keep the stuffing light and even. Always compare the shape as you go so the body stays nicely rounded.
Stitches Used:
- Magic ring or chain start
- Chain
- Slip stitch
- Single crochet
- Increase
- Decrease
- Basic shaping stitches for ears or small details
How to Make It:
Step 1: Start the Foundation
The cat begins in the round, which is very common for amigurumi. You start with a small center and then gradually increase to build the rounded top of the cat. This first section forms the head area, so it is important to keep your stitches even and use a stitch marker right from the beginning. Because plush yarn can hide stitches, marking the first stitch of each round really helps.
As you work the early rounds, you will notice the piece slowly widening into a soft bowl shape. That is exactly what you want. The cat starts very small, but it quickly grows into a cute rounded form.
Step 2: Shape the Ears
One of the nicest things about this cat plush is that the ears are built right into the project instead of being made separately and sewn on later. That makes the process much smoother. When you reach the ear section, the tutorial shows how to shape them directly into the round so the cat starts to look more defined.
This is the part where the personality really starts to appear. Even though the ears are small, they give the plush its cat look right away. Work slowly here and watch your stitch placement so both ears sit evenly.
Step 3: Build the Main Body
After the top section is shaped, you continue working down to create the body. This part is nice and repetitive, which makes it relaxing. The cat keeps that rounded plush shape, so there is not a lot of complicated shaping. You simply continue crocheting in the round, keeping the stitches consistent so the body stays smooth.
Because the tutorial uses plush yarn, the cat ends up looking soft and cuddly instead of stiff. If your tension is too loose, the stuffing may show through later, so it helps to crochet firmly but not tightly. This is one of those projects where a steady rhythm makes a big difference.
Step 4: Add the Cute Details
As the body takes shape, the face details are added. Depending on the version you make, you may use safety eyes or stitch the face with yarn or thread. The face is simple, which suits the plush style really well. A small nose, tiny eyes, and neat placement are enough to make the cat look adorable.
If the tutorial uses more than one yarn color, this is also where the color areas help bring the cat to life. You can keep the same cat-inspired shades from the tutorial, or make your own version in cream, grey, orange, black, white, or even pastel colors. A simple striped or patched look also works beautifully for a crochet cat.
Step 5: Shape the Feet and Lower Section
As you move farther down, the lower body is shaped so the plush has a stable, balanced look. In a no-sew design like this, some of the small features are worked in as part of the body rather than attached later. That helps the toy stay neat and saves time at the finishing stage.
This is also a good moment to pause and check the shape. If the cat is looking too flat, it may need a bit more stuffing later. If it is becoming too stretched, your stitches may be looser than expected. Small checks while working help keep the final plush looking clean and balanced.
Step 6: Stuff the Plush
Before the opening gets too small, add stuffing to the cat. Take your time with this part. Push small pieces in gradually instead of one big handful. That gives a smoother finish and prevents lumps.
Try to fill the top, sides, and bottom evenly. The cat should feel soft and squishy, but still hold its rounded shape well. If you want the plush to sit nicely on a shelf, make sure the lower section is filled enough to support the body.
Step 7: Close the Body
Once the cat is stuffed, the final rounds taper the shape and close the plush. This is where the rounded body comes together. Work neatly through the last stitches so the finish looks tidy. Then fasten off and secure the yarn end well.
Because the pattern is mostly no-sew, this part feels especially satisfying. You do not have a pile of loose pieces waiting to be attached. Instead, the cat is almost fully finished by the time you close the body.
Step 8: Finish the Tail and Final Touches
The tail is an important finishing detail because it completes the cat look. In a project like this, the tail may be crocheted at the end or added with very minimal finishing. Once that is done, all that is left is checking the face, adjusting the stuffing if needed, and weaving in any ends.
The final plush should look round, soft, and cuddly, with a sweet little cat face and tiny ears. It has a simple shape, but that is part of the charm. It feels playful, handmade, and very giftable.
Helpful Tips:
- Use a stitch marker in every round, especially with plush yarn
- Keep your stitches firm so the stuffing does not peek through
- Add stuffing little by little for a smoother shape
- Check that the ears look even before continuing
- Place the face details carefully, since they change the whole expression
- If you make more than one cat, write down your yarn and hook choices so they match
Common Mistakes to Avoid:
- Losing your place in the round
- Crocheting too loosely with chenille yarn
- Overstuffing the plush and stretching the stitches
- Placing the eyes too high or too far apart
- Forgetting to shape the ears evenly
- Rushing the finishing and leaving loose ends visible
Customization Ideas:
You can make this cat plush in all kinds of colors. Try a solid black cat, a cream cat, a grey tabby-inspired version, or a soft pastel cat for a cute nursery gift. You can also add a tiny bow, a mini scarf, blush cheeks, embroidered whiskers, or a sleepy face. If you want a larger plush, simply use thicker yarn and a bigger hook.
Style Ideas:
This cat plush is lovely as a handmade gift for cat lovers, kids, or friends who enjoy cute desk accessories. It also looks sweet on a craft room shelf, tucked into a gift basket, or used as a small seasonal decoration. If made in smaller yarn, it could even become a bag charm or keychain-style plush.
Care Instructions:
Hand wash gently if needed and avoid rough pulling, especially with plush yarn. Lay flat to dry and keep it away from high heat. If the plush gets squashed, reshape it gently with your hands once dry.
Time Needed:
This may take a few hours depending on your speed, yarn, size, and stitch pattern.
Conclusion:
A crochet cat plush is such a fun little project to make when you want something soft, cute, and relaxing. The no-sew style keeps the process simpler, and the plush finish gives it that extra cozy charm. You can keep it classic or play around with colors and little details to make your cat feel unique. If you enjoy amigurumi and want a project that is beginner-friendly but still very rewarding, this is a lovely one to try.
FAQs:
1. Is this beginner-friendly?
Yes, it is a good project for beginners or confident beginners, especially if you already know how to crochet in the round.
2. What yarn is best for this cat plush?
Soft chenille or velvet-style yarn works beautifully because it gives the plush a cuddly, squishy feel.
3. Can I adjust the size?
Yes. Use thicker yarn for a bigger cat or lighter yarn for a smaller one.
4. Do I have to sew many parts?
No, this project is mostly no-sew, which makes it much easier and quicker to finish.
5. Can I make it in different colors?
Absolutely. You can make a realistic cat, a pastel cat, or any fun color version you like.