

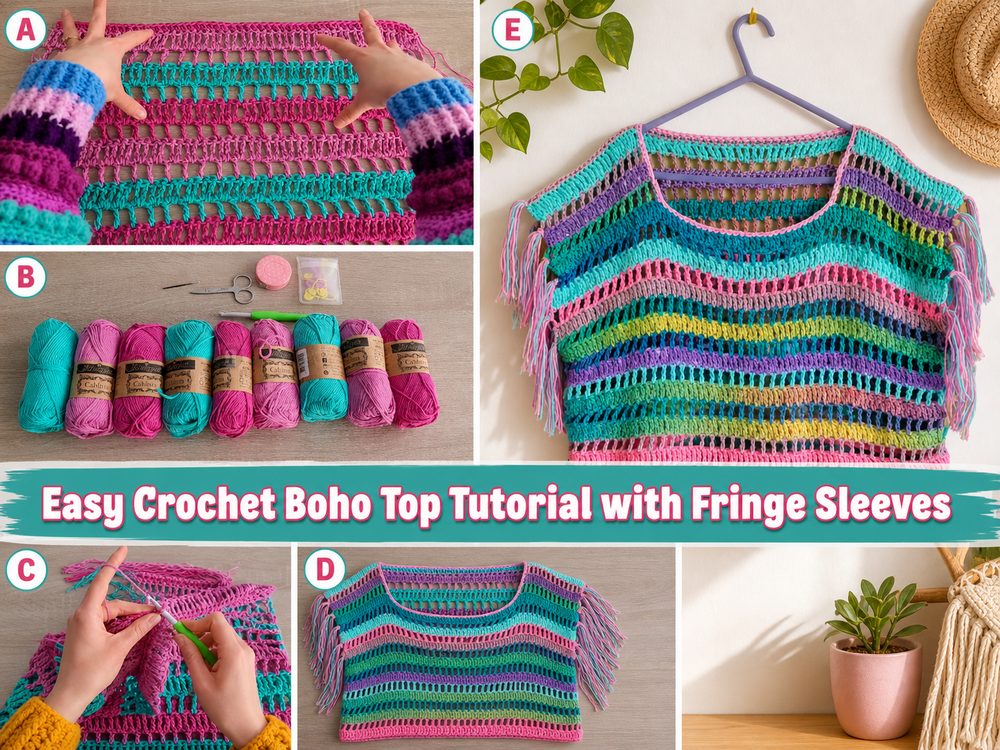
A crochet boho top is one of those handmade pieces that feels relaxed, pretty, and easy to wear. This style has a loose, airy shape, making it lovely for warm days, beach outfits, festivals, or layering over a simple tank. The design is made in a simple panel style, so it is not too fussy, and you can adjust the width and length to suit your own body. The optional fringe gives it that soft bohemian look without making the project complicated. It is a great choice for crocheters who want to try making wearable clothing but do not want to deal with shaping that feels too advanced. With a comfortable yarn, even tension, and a little patience, this top can become a fun handmade wardrobe piece.
Why You’ll Love This Project:
This crochet boho top is simple, stylish, and very wearable. It has a relaxed handmade look that works beautifully for summer, but it can also be layered in cooler weather. Because it is made from basic pieces, it is easier to adjust than many fitted crochet tops.
Materials Needed:
- Yarn suitable for a wearable top
- Crochet hook that works well with your yarn
- Scissors
- Yarn needle
- Measuring tape
- Stitch markers, helpful for keeping edges even
- Optional extra yarn for fringe
Use a yarn and hook size that matches your desired fit and texture.
Best Yarn for This Project:
For a summer boho top, cotton yarn is a lovely choice because it feels breathable, holds shape well, and gives the stitches a clean finish. A cotton blend, bamboo blend, or other soft lightweight yarn can also work nicely if you want more drape. Try not to use yarn that feels too heavy or stiff, especially if you want the top to hang comfortably over the body.
Skill Level:
This project is best for confident beginners or easy-level crocheters. The shape is simple because the top is made with panels, but you should be comfortable making even rows, checking size, and joining pieces together neatly.
Size and Fit Guide:
This style is made to be loose and relaxed, so it does not need to fit tightly against the body. Measure across the bust or the widest part where you want the top to sit, then allow extra room for a comfortable boho fit. You can make the panels wider for a roomier top or narrower for a closer fit. To adjust the length, simply add or remove rows before joining.
Stitches Used:
- Chain
- Double crochet
- Slip stitch for joining or finishing
- Basic seaming
How to Make It:
Step 1: Start the Foundation
The top begins with a simple foundation for the first panel. Since this is a made-to-fit style, the most important thing is to start with a width that suits your body. The panel should be wide enough to cover the front comfortably without pulling across the chest.
Before going too far, hold the foundation against yourself or compare it with a top you already like. This little check can save a lot of time later. For a loose boho look, the panel should not feel tight.
Step 2: Build the First Panel
Once the foundation is ready, the body of the panel is worked in rows. The tutorial keeps the construction simple, using a repeated stitch pattern that creates a soft crochet fabric. Work carefully across each row and make sure your edges stay straight.
This is where even tension matters. If your tension changes too much, one side of the panel may become longer or wavier than the other. Use stitch markers at the edges if you tend to miss the first or last stitch.
Continue working until the panel reaches the length you want for the top. You can make it cropped, waist-length, or a little longer depending on your style. For a beachy summer version, a slightly shorter length looks cute with high-waisted shorts or skirts.
Step 3: Make the Second Panel
The second panel is made the same way as the first. This piece becomes the back of the top, so it should match the front panel as closely as possible.
Lay the first panel flat and compare the second panel against it as you work. Count rows when possible, or measure both panels with a tape measure. Matching the two pieces helps the top sit evenly on the shoulders and sides.
Because this top has a relaxed shape, it is forgiving, but the panels should still be close in size. If one panel is much longer or wider, the finished top may twist or hang unevenly.
Step 4: Check the Shape and Fit
Before joining, place the two panels together and check the size. Hold them against your body or lay them over a top that fits you well. Look at the width, length, neckline area, and arm opening.
The beauty of a simple boho top is that you can adjust it before sewing. Want more room? Add width to your panels. Want a longer top? Add more rows. Want it lighter and more open? Use a slightly larger hook with a breathable yarn.
For summer wear, avoid making the fabric too dense unless you plan to wear it as a layering piece. A softer, looser texture will feel cooler and more comfortable.
Step 5: Join the Shoulders
After both panels are finished, place them together with the right sides facing the way you want. Join the shoulders, leaving a comfortable opening for the neck.
Do not make the neck opening too tight. A boho top usually looks best with a relaxed neckline that slips on easily. You can try it on before fully securing the shoulder seams to make sure the opening feels right.
Use a yarn needle or slip stitches to join, depending on the look you prefer. A sewn seam can feel softer, while slip stitching gives a firmer join.
Step 6: Join the Sides
Next, join the side seams while leaving space for the armholes. The armholes should be roomy enough for easy movement, especially if you are adding fringe to the sleeve area.
Try the top on before closing too much of the sides. This is the easiest way to see whether the arm opening feels comfortable. If the top feels too boxy, you can join a little more at the sides. If you want a looser festival-style look, leave the armholes more open.
Step 7: Add the Fringe
The fringe is what gives this top its strong boho feeling. Cut several strands of yarn to the same length, then attach them along the sleeve or armhole area. Keep the spacing even so the fringe hangs nicely.
After all the fringe is attached, trim the ends if needed. You can leave the fringe long and dramatic or keep it shorter for a softer everyday look. If you are using cotton yarn, the fringe usually hangs nicely and gives the top a relaxed handmade finish.
Step 8: Finish the Edges
Once the top is joined, weave in all loose ends carefully. Check the neckline, bottom edge, and armholes. If the edges look uneven, you can add a simple round of slip stitches or single crochet only if you want a cleaner finish.
The final top should look loose, easy, and bohemian, with a simple handmade texture and optional fringe at the sleeves. It should feel comfortable enough to wear over a camisole, bikini top, bralette, or fitted tank.
Helpful Tips:
Use a soft cotton or cotton-blend yarn if you want a breathable summer top. Check your fit before joining the shoulders and sides. Make both panels the same size so the top hangs evenly. Keep your stitch tension relaxed but consistent. Use stitch markers at the row edges if your sides start to lean. Light blocking can help the finished top look neater.
Common Mistakes to Avoid:
- Making the panels too narrow and losing the relaxed boho fit
- Forgetting to compare the front and back panels while working
- Closing the armholes too tightly
- Using yarn that feels too heavy for a summer top
- Attaching fringe unevenly
- Skipping the try-on step before seaming
Customization Ideas:
You can make this top in one solid color for a clean look or use stripes for a more playful summer style. Add longer fringe for a festival outfit, or skip the fringe for a simpler everyday top. You can also make the body shorter as a crop top or longer as a tunic-style layer. A scalloped edge, tassels, wooden beads, or soft color changes would all suit the boho style beautifully.
Style Ideas:
Wear this crochet boho top over a fitted tank, bralette, or swimsuit. It looks lovely with denim shorts, wide-leg pants, maxi skirts, or beach cover-up outfits. For a softer handmade look, pair it with neutral colors and simple sandals. It also makes a thoughtful gift for someone who loves relaxed summer fashion.
Care Instructions:
Hand wash the finished top gently in cool water, especially if you use cotton yarn or add fringe. Avoid twisting or wringing it hard. Press out extra water with a towel, reshape the top, and lay it flat to dry. Keep it away from high heat so the yarn stays soft and the shape remains neat.
Time Needed:
This may take a few hours depending on your speed, yarn, size, and stitch pattern. The fringe and finishing can add extra time, but the simple panel construction keeps the project manageable.
Conclusion:
This crochet boho top is a lovely project when you want something handmade, stylish, and easy to adjust. The simple panel shape makes it approachable, while the fringe adds personality and movement. Choose a yarn that feels good against the skin, check the fit as you go, and make the final piece your own with color, length, and finishing details.
FAQs:
Is this crochet boho top beginner-friendly?
Yes, it is suitable for confident beginners who can work basic rows and join pieces together.
What yarn is best for this project?
Cotton, cotton blend, bamboo blend, or soft breathable yarn works best for a summer version.
Can I adjust the size?
Yes. Make the panels wider, narrower, longer, or shorter to suit your body and preferred fit.
Can I make it without fringe?
Yes. The fringe is optional, and the top still looks cute with clean simple edges.
Can I sell the finished top?
You can usually sell handmade finished items, but always respect the original tutorial creator’s pattern terms.