8 Toilet Paper Roll Butterflies
Butterflies are one of the prettiest ways to turn an ordinary toilet paper roll into something bright, playful, and display-worthy. These ideas are easy to adapt for toddlers, preschoolers, older kids, and even adults who enjoy simple recycled crafts. Some are quick and colorful for classroom use, while others feel a little more decorative for spring shelves or party tables. Below you’ll find eight toilet paper roll butterfly ideas that are clearly different from each other, with simple materials, easy steps, and tutorial sources you can follow for the full project. Each one also includes a Pinterest-friendly image prompt inspired by the finished tutorial look.
Simple Marker Wing Butterfly

This is a great starting craft when you want something fast, low-mess, and easy for young kids to finish in one sitting. The tube body keeps the butterfly nicely three-dimensional, while hand-drawn wings let each child make it unique with markers, doodles, and bright patterns. It feels cheerful without needing many supplies.
Materials:
Toilet paper roll, paper, markers, googly eyes, pipe cleaner, glue, scissors
Steps:
- Paint or color the roll for the body.
- Cut a butterfly wing shape from paper.
- Decorate the wings with markers or patterns.
- Glue the roll to the center of the wings.
- Add eyes and a curled pipe-cleaner antenna.
Tutorial Link: Gluesticks Blog tutorial.
Washi Tape Butterfly
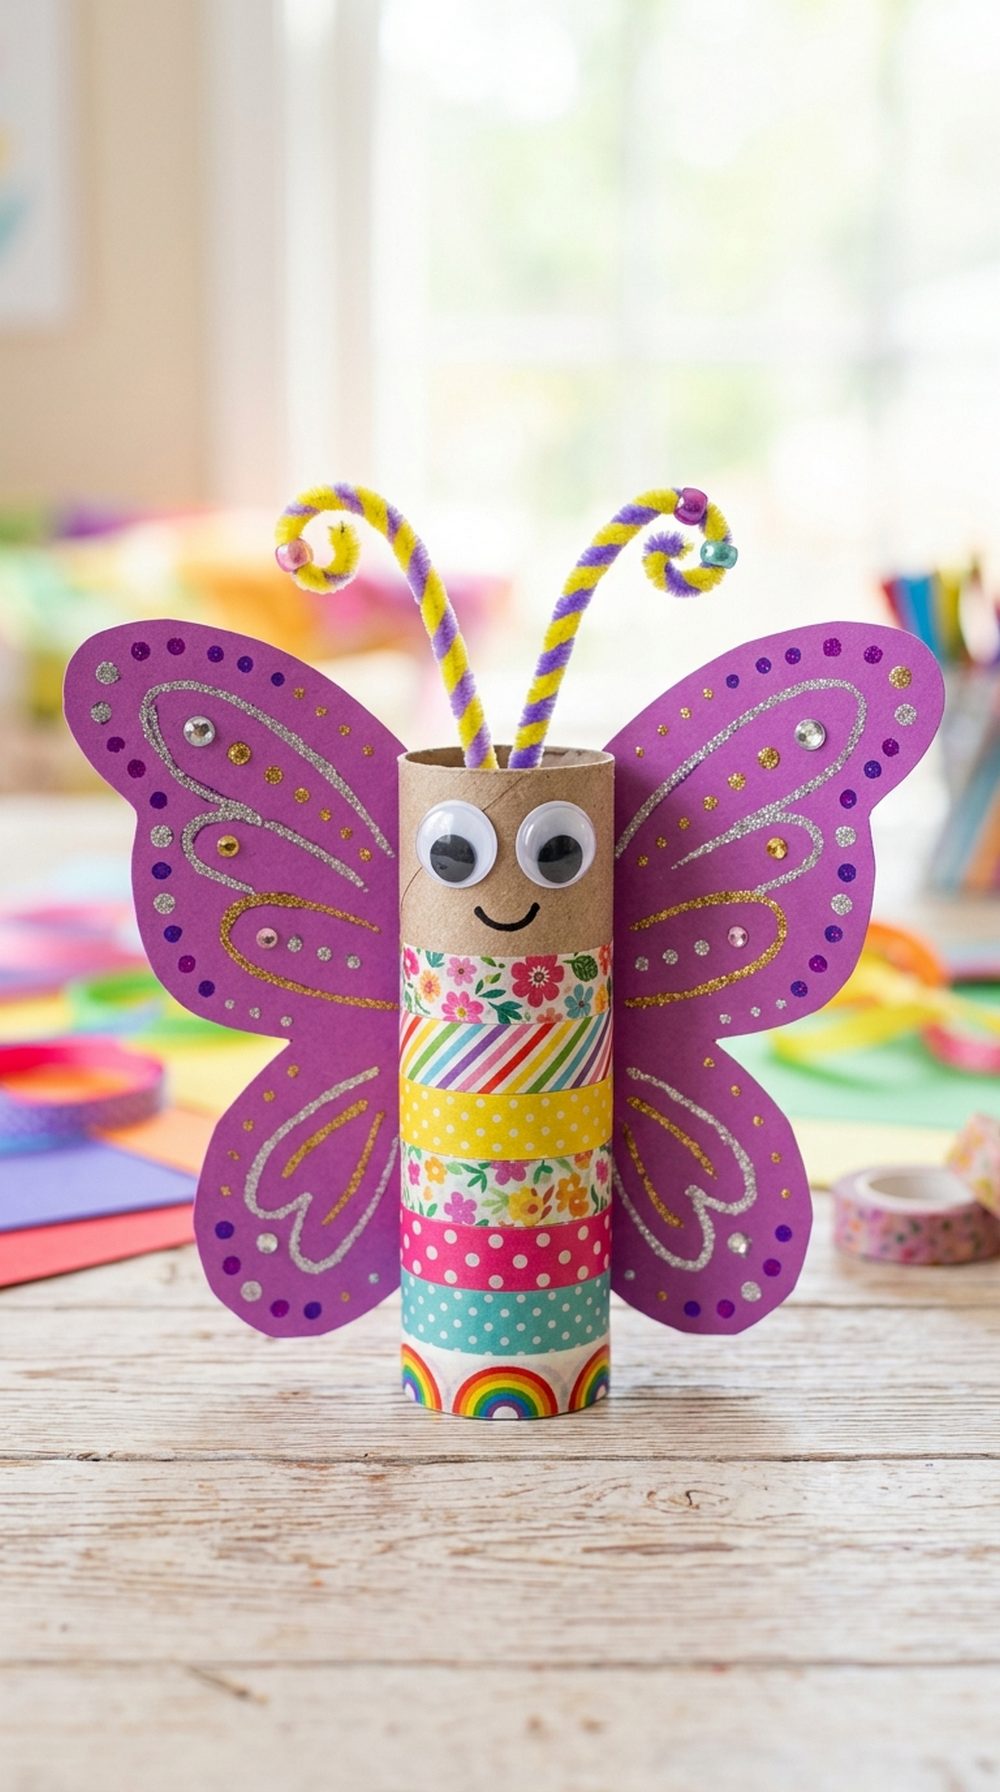
This version is perfect when you want a clean, polished look without paint drying time. Wrapping the tube in washi tape gives the butterfly body instant color and pattern, and the large paper wings make it feel extra bold and display-ready. It is simple enough for kids, but still looks very cute on a spring bulletin board.
Materials:
Toilet paper roll, butterfly wing template, cardstock, washi tape, googly eyes, pipe cleaner, glue dots
Steps:
- Cut out the butterfly wings from cardstock.
- Wrap the tube neatly with washi tape.
- Add googly eyes to the front.
- Attach curled pipe-cleaner antennae.
- Press the body onto the center of the wings.
Tutorial Link: Simply Crafty Life tutorial.
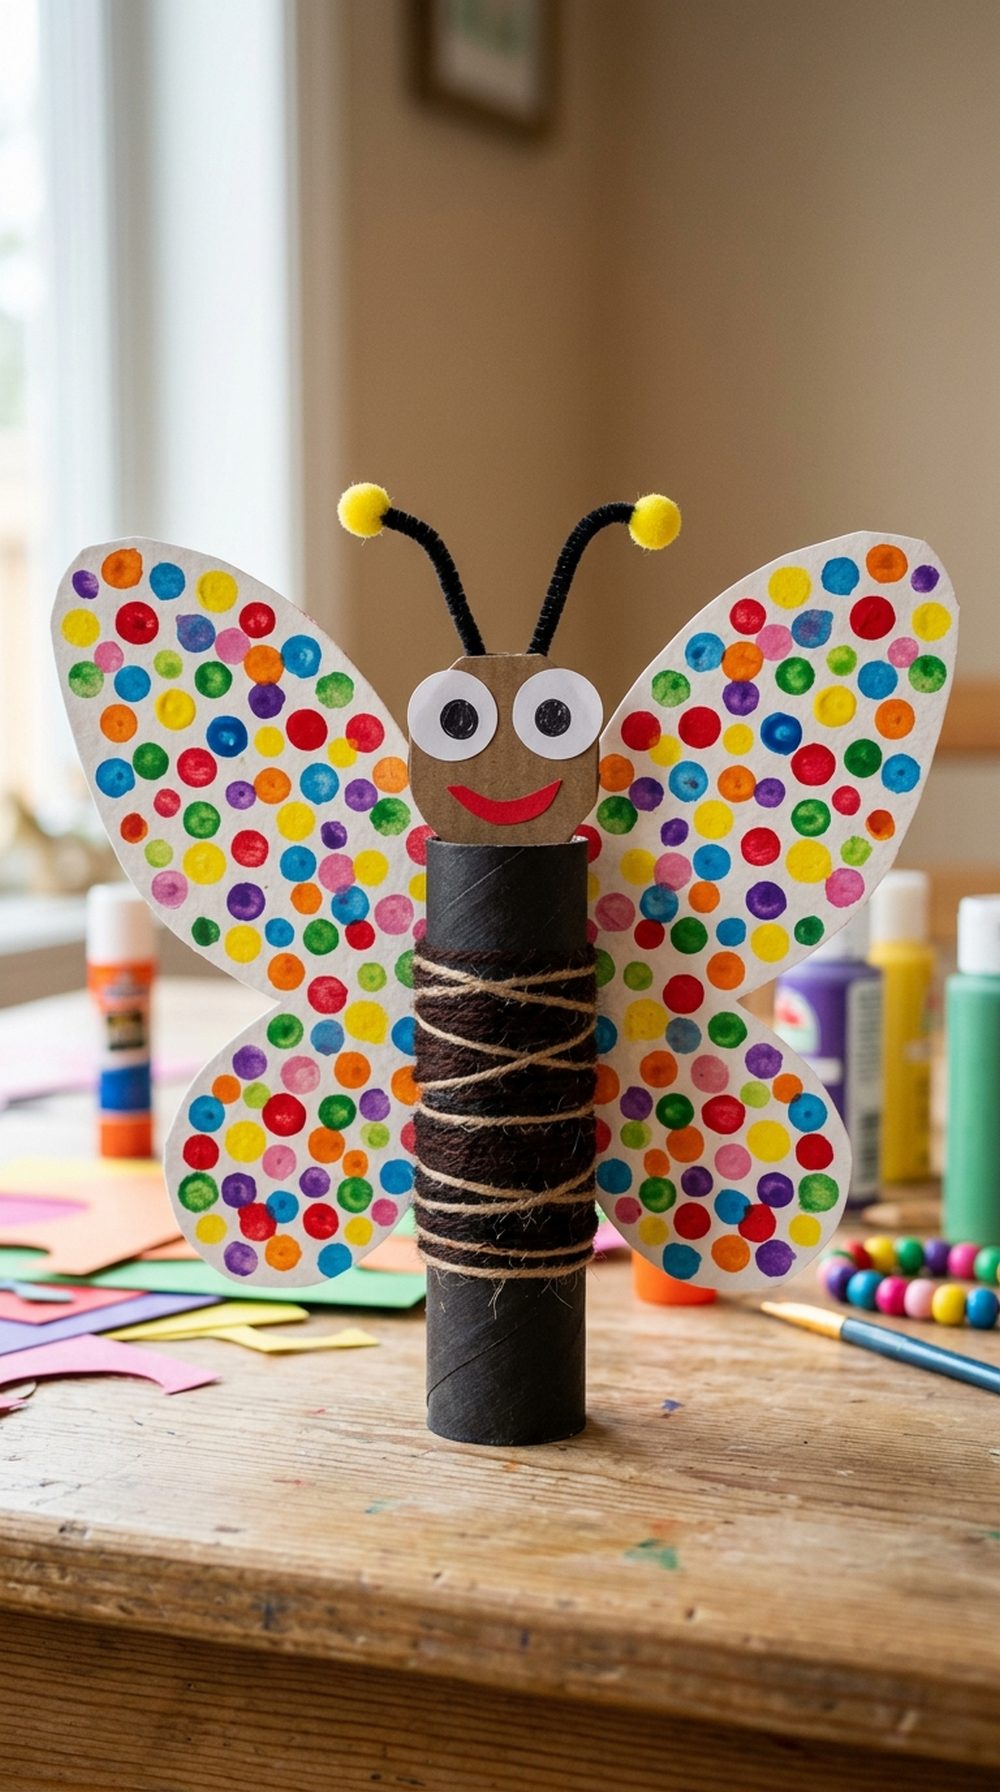
Beaded Loop Butterfly

This butterfly feels a little different because the wings are made from cut tube loops instead of paper. The beaded pipe-cleaner body gives it a fun dimensional center and a more crafty, decorative finish. It is a smart pick when you want to reuse every bit of the cardboard tube and make something slightly more intricate.
Materials:
Cardboard tube, paint, pipe cleaner, pony beads, glue, scissors
Steps:
- Flatten and paint the tube inside and out.
- Cut it into narrow strips.
- Bend the strips into small and large loops for wings.
- Glue the loops together in butterfly shape.
- Thread beads onto pipe cleaner and attach as the body.
Tutorial Link: Crafts by Amanda tutorial.
Punched Paper Butterfly

If you love scrapbook-style crafts, this one is especially charming. The tube body pairs with a wing base covered in colorful punched paper shapes, giving the butterfly a layered and playful look. Ribbon antennae add a sweet finishing touch, and the result looks bright, tidy, and very giftable for spring or classroom displays.
Materials:
Toilet paper roll, cardstock, patterned paper, ribbon, craft punches, adhesive
Steps:
- Cover or paint the tube body.
- Cut a wing base from cardstock.
- Punch flowers and circles from decorative paper.
- Glue the shapes across the wings.
- Add ribbon antennae and attach the body to the wings.
Tutorial Link: BoBunny spring craft tutorial.
Glitter Foam Butterfly

This idea has a bolder, more sparkly finish that really stands out on a shelf or craft table. Layered foam wings make the butterfly look full and sturdy, and glitter or gems can be added for extra shine. It is a fun option when kids want something more decorative and colorful than a basic paper version.
Materials:
Toilet paper roll, acrylic paint, butterfly template, craft foam, glue, sequins or gems
Steps:
- Paint the roll and let it dry.
- Trace large and small butterfly shapes from a template onto foam.
- Cut out both wing layers.
- Glue the smaller wings over the larger wings.
- Attach the body and decorate with glittery accents.
Tutorial Link: Fun Money Mom tutorial.
Printable Wraparound Butterfly

This is one of the easiest choices for group crafting because the printable helps keep the shape consistent while still leaving room for coloring and personalization. Kids can decorate first, then wrap and glue the parts in place. The finished butterfly looks neat, friendly, and ideal for preschool or kindergarten spring themes.
Materials:
Butterfly printable, toilet paper roll, crayons or markers, tape or glue, scissors
Steps:
- Print the butterfly template.
- Color the printable wings and body details.
- Cut out all the pieces.
- Wrap the body piece around the roll.
- Attach the wings and antennae to finish.
Tutorial Link: Somewhat Simple Kids tutorial.
Vintage Decoupage Butterfly

This butterfly is a lovely choice for older crafters or anyone who wants a softer, decorative look. Instead of bright kid-style wings, it uses book pages or napkins and embellished trim for a more delicate finish. The result feels handmade, romantic, and perfect for spring trays, shelves, or gift toppers.
Materials:
Toilet paper roll, book pages or decorative napkins, glue, trim, scissors, embellishments
Steps:
- Cut the tube into a butterfly wing form.
- Shape the wings and body as shown in the tutorial.
- Cover the cardboard with book pages or napkin pieces.
- Glue everything smoothly and let it dry.
- Add trim or small embellishments for detail.
Tutorial Link: Just That Perfect Piece tutorial.
Polka Dot Wing Butterfly
This version is bright, symmetrical, and very fun for kids who enjoy cutting and sticking shapes. The wings are made from folded paper, then covered with colorful paper dots for a cheerful spotted design. It is simple, budget-friendly, and looks especially nice when made in several color combinations and displayed together.
Materials:
Colored paper, toilet paper roll, paper circles, scissors, pencil, double-sided tape, black and white paper for eyes
Steps:
- Fold paper and draw one half of a butterfly wing.
- Cut it out and open for a full wing shape.
- Cover the roll with darker paper.
- Tape the body to the center of the wings.
- Add eyes, a smile, and colorful paper polka dots.
Tutorial Link: Kids Art & Craft tutorial.
Conclusion:
These toilet paper roll butterfly crafts are proof that a simple recycled tube can turn into something colorful, creative, and genuinely cute. You can keep them basic with markers and paper, or dress them up with beads, foam, washi tape, or decoupage details. Pick one easy version for a quick afternoon craft, or make a whole butterfly collection in different styles for spring decorating.
FAQs
1. What age is best for toilet paper roll butterfly crafts?
Most of these work well for preschool and elementary ages, with adult help for cutting.
2. Can I use paper towel rolls instead?
Yes. A longer roll can make a bigger butterfly body or be cut down to size.
3. What can I use instead of paint?
Washi tape, colored paper, markers, sticky foam, or printed templates all work well.
4. How do I make them sturdier for display?
Use cardstock or foam for the wings, and let glue dry fully before hanging or standing them up.